


Can’t figure out how to convert a Java File to an Executable on multiple platforms, whether you’re using Windows, macOS, or Linux? We’re here to help you!
Java distributions can be a significant pain to figure out — especially when you have no clue how these files work on the backend of your native operating system. While there are multiple ways to package Java files, most are too arduous for beginners.
Now, you could pay someone to do it on your behalf, but that’s no fun — especially when you’re a programmer.
Since converting java files to executables isn’t a one-step process, you’d have to delve deep into the technical stuff to understand it truly.

With that out of the way, the best method of converting Java files into an executable is by using the built-in functionality of an IDE like IntelliJ IDEA. While this shaves off some technical flexibility, it’s plenty for beginners and regulars.
Hence, it’s recommended you download and configure the IntelliJ IDEA by creating and opening your project from there. This IDE is available on Windows, macOS, and Linux, thereby making it perfect for our use case:
| Operating System | IDEA Source |
| Windows | Download |
| macOS | Download |
| Linux | Download |
This article will primarily focus on creating executable JAR files for your specific operating systems. For simplicity’s sake, we will use built-in IntelliJ IDEA methods to achieve this goal.
Table of Contents
Creating A Project On IntelliJ IDEA
1. Installation Setup
Once you’ve downloaded the above file, it’s finally time to install it and give the IDEA a go.
Windows Install
Here’s what you need to do for Windows:
- For starters, click on the setup and press Yes to the Windows Prompt.
- Next, select your settings, and don’t forget to add IntelliJ IDEA to the path. Here’s what it’ll look like:
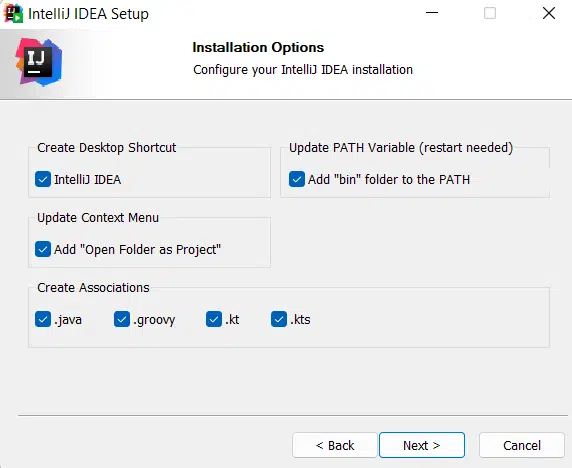
- Add the bin folder to the PATH and hit Next >.
- Now, press Install, and wait for the process to finish.
Linux Install
The installation steps you’d need to take will differ vastly if you’re on Linux. Luckily, we have those listed for you down below:
- Press CTRL + ALT + T to open the terminal, and enter the following command:
cd /opt/
- Once the directory has been changed, enter the following command to extract the installation file from the downloads directory.
sudo tar -xvzf ~/{File_Path}
- Replace the {File_Path} with the actual path of the downloaded installation file. For example, an IDEA file stored in the Downloads folder will look something like this:
sudo tar -xvzf ~/Downloads/ideaIU-2020.3.tar.gz
- Wait for the installation to finish, and use the following command to open IntelliJ IDEA:
/opt/idea/bin/idea.sh
Mac Install
The installation process on macOS is pretty simple compared to the rest. Just drag the .dmg file from the Downloads Folder to the Applications Folder, and you’re good to go!
2. Creating a Project Out of the Java File
Once you’ve downloaded and opened IntelliJ IDEA, it’s time to create a new project, so you can load all your files up to convert them to an executable later on.
With that said, follow the steps below for all platforms:
- Launch IntelliJ IDEA, and choose New Project in the Welcome Screen. If it doesn’t show up for you, select File > New > Project instead.
- Next, wait for the New Project menu to open up and choose your configurations. You can also select a language that does not come packaged with IDEA.
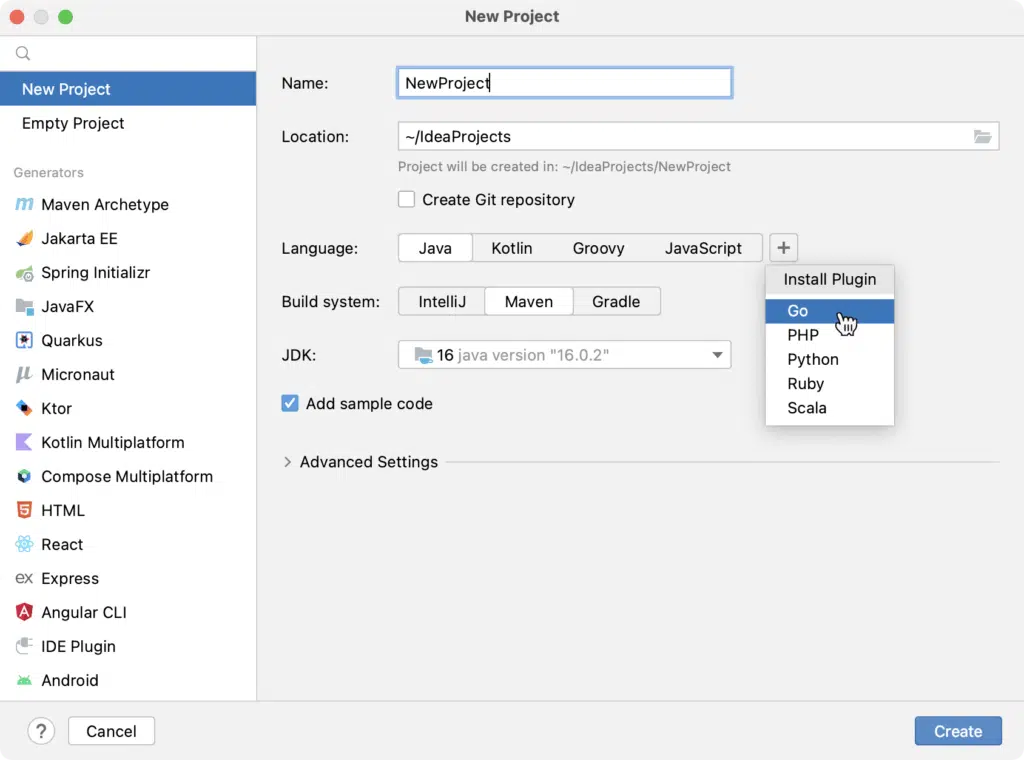
- Now, select the Build System, and choose a JDK from the list. If you don’t have one, click the download button.
Once the project has been built, open its path and add your code files as needed. This will work on Windows, macOS, and Linux since IntelliJ IDEA is the same on all platforms.
Building Java Applications
1. Converting a Java File to JAR
Once your project is ready and running, it’s time to export it into the JAR config, which can be later processed into a .exe file.
With that said, here’s how you can do it:
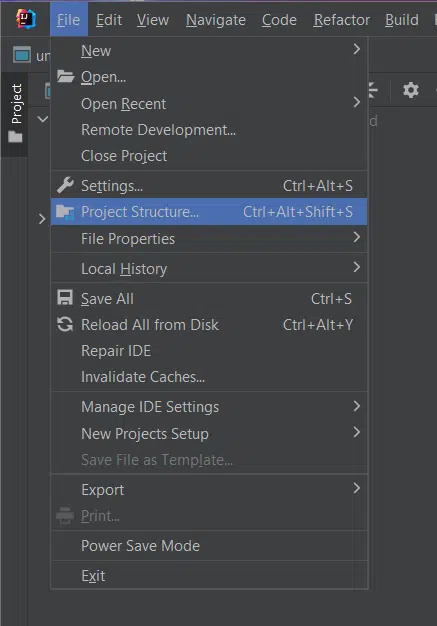
- To begin, open the File menu from the top left and head to Project Structure.
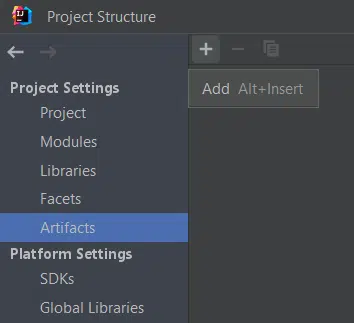
- Move your way to the Artifacts, and click on the + sign.
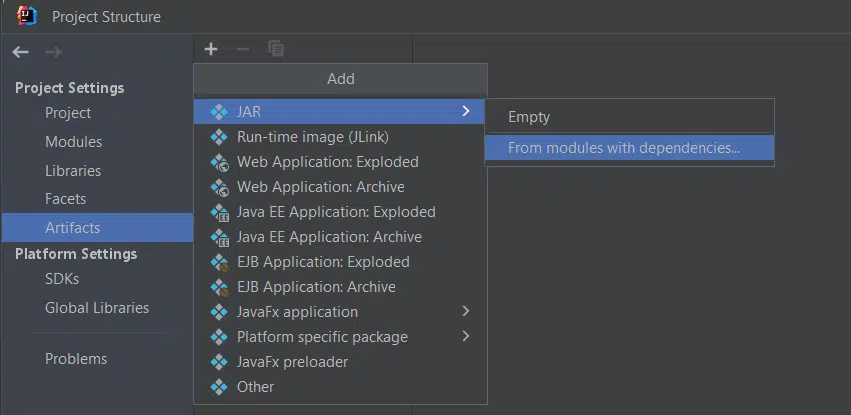
- Now, hover over JAR, and choose From modules with dependencies.
- Lastly, select PATH, and any optional Class, and extract it to the target JAR.
Doing so will make a JAR file that can not only help you convert regular JAVA files to .exe, but also the JAVA Class ones.
2. Convert JAR to Windows exe
You will need to download an application called Launch4J to make this work. Just click on this link, and press the download button.
Once the application has been downloaded, follow the below steps:
- To start, open Launch4J and select the output file location.
- Next, enter the PATH to your JAR file and fill the rest with your preferred configurations.
- Now, click on the Gear button, and name your file to click save.
That’s it! Just open the new exe file you’ve created, and you’re pretty much done.
3. Convert JAR to macOS Executable
Just like Windows, you’d need the aid of some third-party packages to make this work.
Here are all the steps you need to follow:
- Firstly, install brew on your macOS, and enter the following command in your terminal:
brew install python3
- Now, enter the following commands in the terminal:
cd jar2app

sudo ./install.sh /usr/local

/usr/local/jar2app ~/Downloads/pathg.jar // replace jar path with your jar
- Check and run the new application created in the directory; you’re good to go!
4. Convert JAR to Linux Executable
Unlike Windows, Linux does not feature executable files. Rather, you get files that are just a bunch of compiled code or scripts run with interpreters’ help.
To make JARs work on Linux, you’d have to create a bunch of hashbang commands.
Here’s how it works:
- To get started, create a file with the java jar hashbang.
$ echo '#!/usr/bin/java -jar' > myBin
- Now that we have written the hashbang as a string to the new file myBin. It’s time to write the jar to the file:
$ cat my.jar >> myBin
- Lastly, set the myBin file to an executable by using the following commands and run the program:
$ chmod +x myBin

$ ./myBin
Conclusion
To sum up, in this article, we showed you how to convert a Java file to an executable on Windows, macOS, and Linux.
Essentially, it would help if you could convert your JAVA project into a JAR file. Once that’s done, it’s about issuing the commands in their respective operating systems. As mentioned, Linux doesn’t have executables, so you’d be creating a gimmick instead.
Luckily, the process is pretty simple once you get the hang of it since most of the complex stuff is pre-handled by IntelliJ IDEA. Alternatively, you could try your luck at Eclipse if IntelliJ IDEA is too much for you.
Save the resultant JAR file in an accessible PATH, so you won’t have to find it later.
If the steps mentioned above cause an error, try rebooting your device or computer or perform a clean reinstall of the error-causing software.
Lastly, let us know in the comments:
- Were you able to create a JAR file from your JAVA project?
- Have you been able to find a more straightforward be-all-end-all fix?
- Which kind of software are you trying to make?
- Are there any other points or helpful information you believe we should’ve mentioned?
Feel free to share this article amongst your friends and peers, so they don’t have to rack their brains to convert JAR or Java files into executables.