Do you have issues with Disqus comments not showing or loading on your WordPress website?
Disqus is among the most popular commenting plugins for WordPress. Like with most plugins, problems can arise from time to time. A common problem with Disqus happens when it fails to load your comments on the site. Other times, it might load them, but it doesn’t display them for your reader.
This can be a frustrating problem, especially if you have an active reader base that comments on your posts all the time.
Your readers will also be frustrated because they might not be able to comment on your posts as they’d like. This can result in people leaving your website, which you don’t want.
Keeping these things in mind, we offer six solutions to common issues that could result in WordPress Disqus comments not showing on your website.
Let’s start and talk about these solutions one by one.
Table of Contents
- 1. Enable Commenting Through WordPress Discussion Settings
- 2. Allow Commenting on Individual WordPress Posts
- 3. Enable Commenting through Disqus Plugin Settings
- 4. Enable Commenting When Your Site Was Moved to a New Domain
- 5. Clear the Page Cache Through WordPress
- 6. Delete the Web Browser Cache
- The Final Hope
1. Enable Commenting Through WordPress Discussion Settings
If the Disqus widget doesn’t appear on the site’s layout, your comments won’t be shown to your readers.
Most likely, your comments were disabled on the whole website. Usually, a WordPress website has its comment section enabled by default. Even so, you must check for this yourself.
To do this, follow the below steps:
- First, go to your WordPress admin area.
- After that, move over to Settings and click on Discussion.
- Next, make sure the option “Allow people to post comments on new articles” is ticked.

If for some reason, this option isn’t ticked, then click on the box to do so. Then don’t forget to save these changes at the bottom of the page.
2. Allow Commenting on Individual WordPress Posts
Another situation when WordPress Disqus comments are not showing is when only certain posts have Disqus comments disabled. To solve this problem, the solution is quite straightforward: all you have to do is to enable discussions for those specific articles, or in other words, allow commenting on individual WordPress posts.
If you’re wondering how to do that, here’s a simple walkthrough:
- First, open one of your posts that lacks the comment section.
- Next, click on the screen options drop-down menu and tick the Discussion box if it isn’t yet.
- Now close this menu and scroll down until you find the discussion section.
- Here, check the allow comments option.
- Lastly, don’t forget to save these changes by updating the post.
Of course, to make sure this solution worked, we suggest you check it asap. To do that, just open up the blog post that you just fixed. Now at the bottom of the page, check to see if your comments show or not.
If they appear normal, then congratulations, you solved the problem! However, if those pesky comments still don’t appear, go ahead and try the two other solutions listed here in this article.
3. Enable Commenting through Disqus Plugin Settings
Sometimes, no comments appear after your blog posts, even though Disqus works on the whole website.
Why is that?
This problem appears when comments are hidden because they weren’t closed by the writer/editor.
There’s a certain setting that you can find in the plugin’s settings section that will help solve this issue. Just follow the steps below:
- First, on the left side of the WordPress admin area, hover over the Comments menu.
- Next, find and click on Disqus.
- Now, on the far right, you’ll find the plugin settings option, click on it.
- Here, you must choose the All Blog Posts option, to make sure your comments will be displayed on every single post.

If all these three solutions fail, there are three more options you can try out. However, before applying these methods, we highly suggest you go through all the previous ones rigorously.
4. Enable Commenting When Your Site Was Moved to a New Domain
These days, migrating a website to a new domain is a simple task, especially on WordPress, due to the plethora of handy migrating tools and plugins. When you migrate your WordPress website to a new domain, then you assume your comments were also moved, right?
Well, that’s how it usually goes. However, if you’re using Disqus to manage your blog’s comments, they could be hidden on the new domain. Why does this happen?
To make sure all the comments will be displayed even after you moved the site, you must complete an additional step in Disqus.
Here’s how:
- First, open your Disqus Account.
- Now, find the migration tools: Community – Tools – Migration Tools.
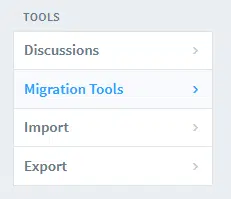
- Here, check if the domain where you want to migrate the site is the correct one and then click on Next.
- Enter the domain name where you want to move the website.

- Lastly, click next, but not before you double-check. Keep in mind, this cannot be undone!
If you did everything as described above, your Disqus comments should be showing on your new domain.
5. Clear the Page Cache Through WordPress
WordPress, like any other web software, stores cache on its servers. Deleting or clearing the cache memory can solve many issues. In our case, it can likely result in a solution for your Disqus comments that won’t load.
To delete your WordPress cache, you must install a caching plugin and use it to clear your cache memory. Here’s how:
- On the plugin page, search for W3 Total Cache and install it.
- When installed, head over to the Performance section, then click on Dashboard.
- Here, click on the empty all caches button.
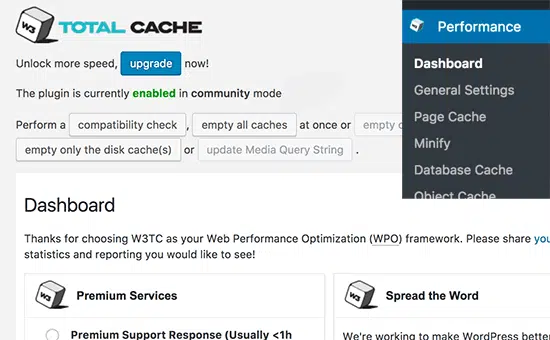
Now, the plugin will clear all the cached memory in WordPress.
All you have to do now, is to check if your Disqus comments will load or not. If they still don’t, move on to the next possible solution:
6. Delete the Web Browser Cache
If deleting the cache through WordPress doesn’t solve the issue, you should try deleting your browser’s cache all together. This is a simple, yet powerful method that solves these kinds of issues.
Since there are many different web browsers out there, we will show you how to do this on the popular ones:
For Google Chrome
- First, open your Chrome browser then at the top right click More than More Tools.
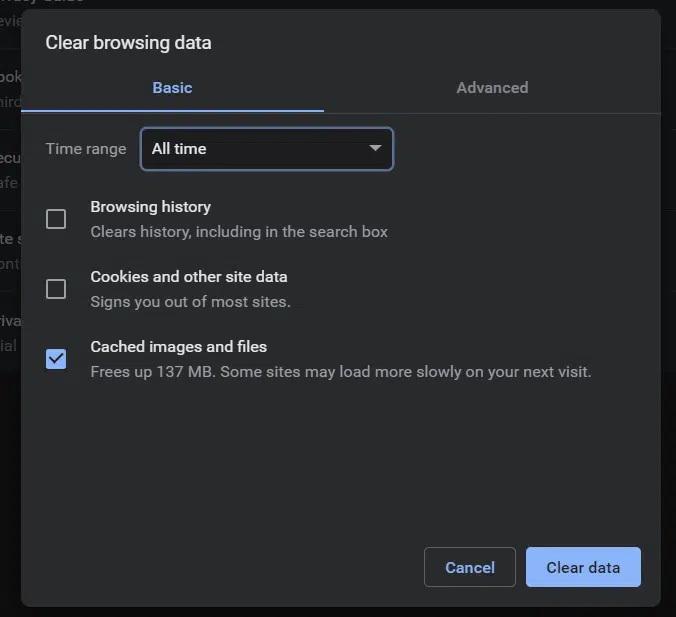
- Next, click Clear Browsing Data then choose the time range, like Last Hour or All Time
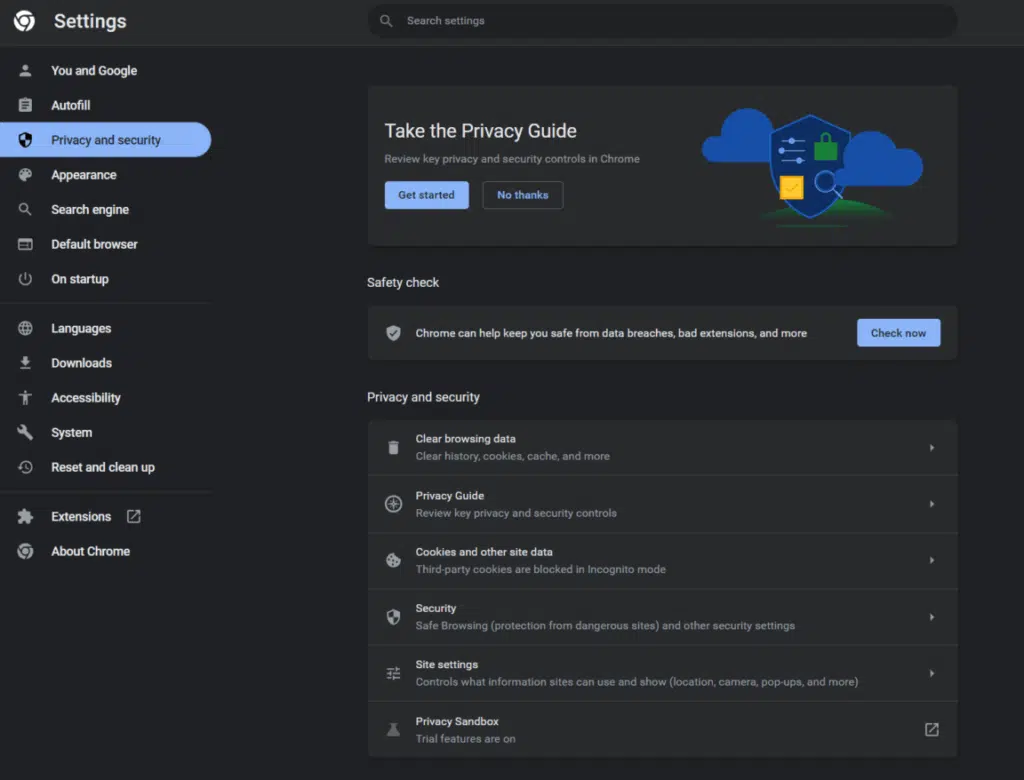
- Finally, choose the type of data you’d like to be removed and click Clear Data.
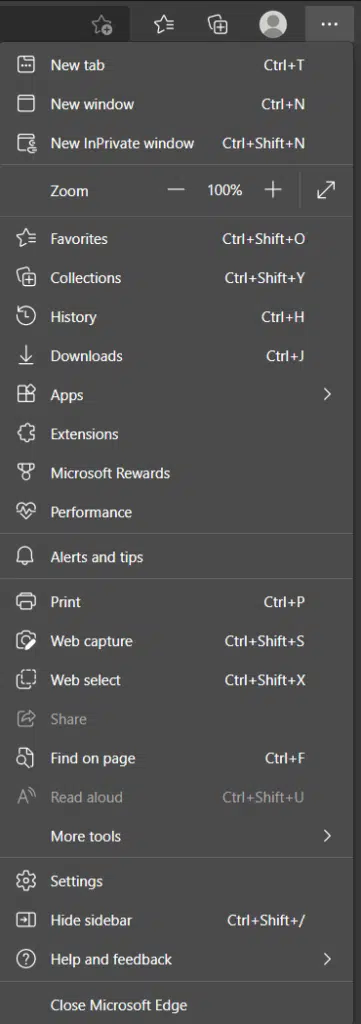
For Microsoft Edge
- Begin by clicking on the kebab menu in the window’s top right corner.
- Then, in the drop-down menu, select Settings.
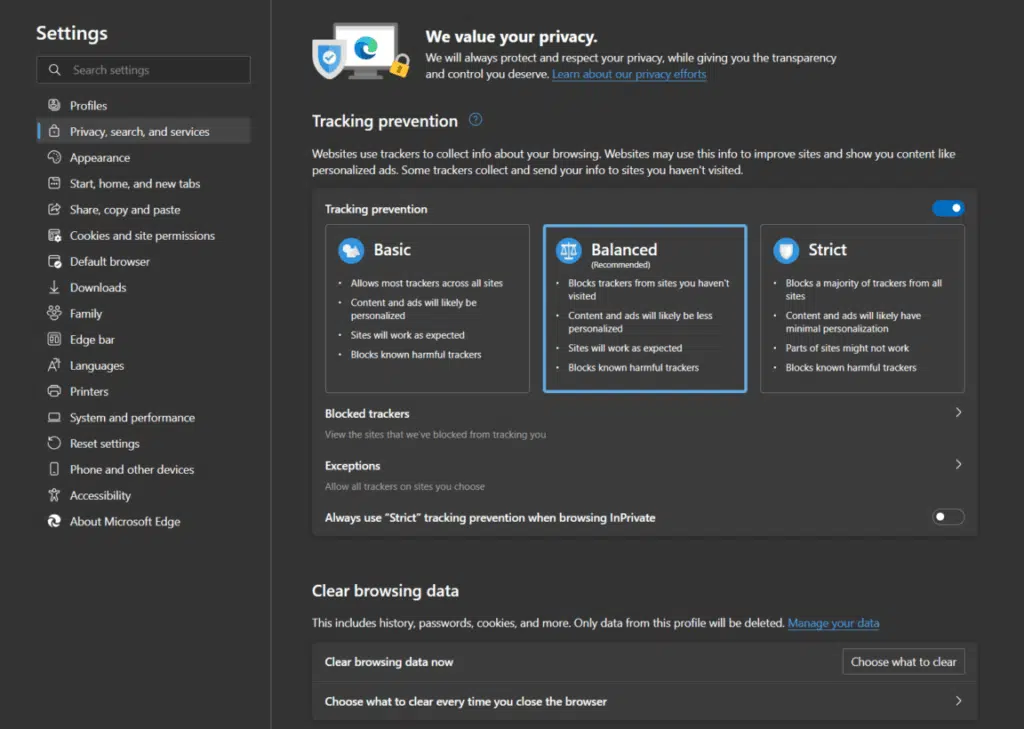
- On the newly opened page, click on Privacy, search, and services in the left sidebar.
- Then, under the Clear browsing data section, click the Choose what to clear button.
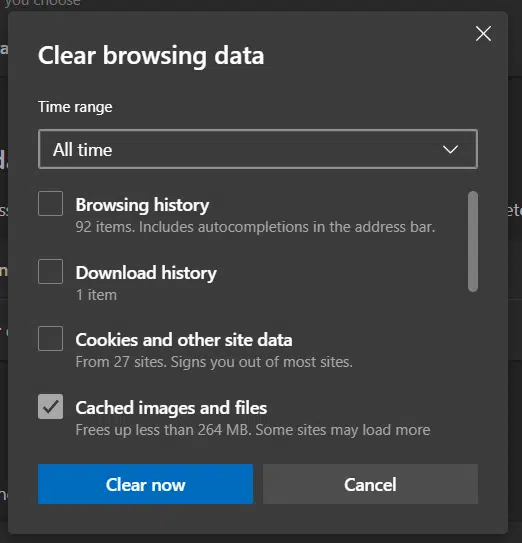
- After that, in the popup window, ensure the Time range is set to All time.
- Next is to ensure that only the Cached images and files option is checked.
- Click on the Clear now button in the popup window to get rid of the cached data.
- Finally, restart your browser as detailed in Step 1 to ensure all changes take effect.
For Safari (macOS)
- First, start by opening up the Safari app.
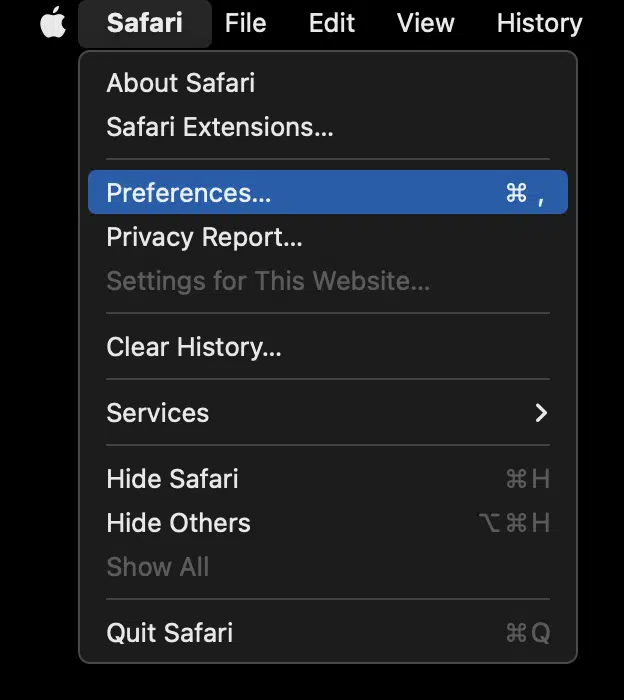
- Then, in the top bar, click on the Safari option.
- In the drop-down menu, select Preferences.
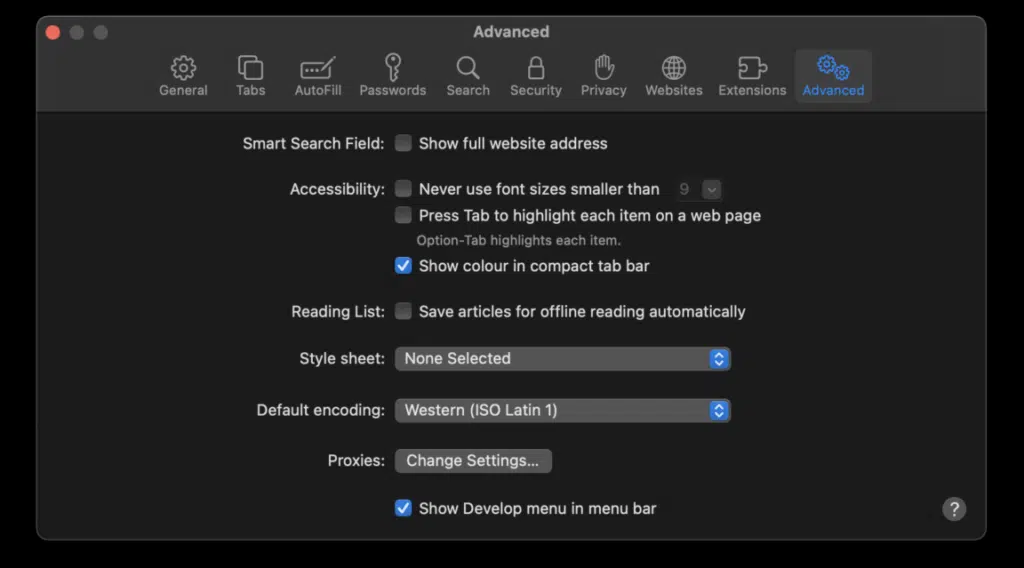
- Afterward, in the new window, select the Advanced tab on the far right side.
- Ensure that the Show Develop menu in the menu bar option is checked.
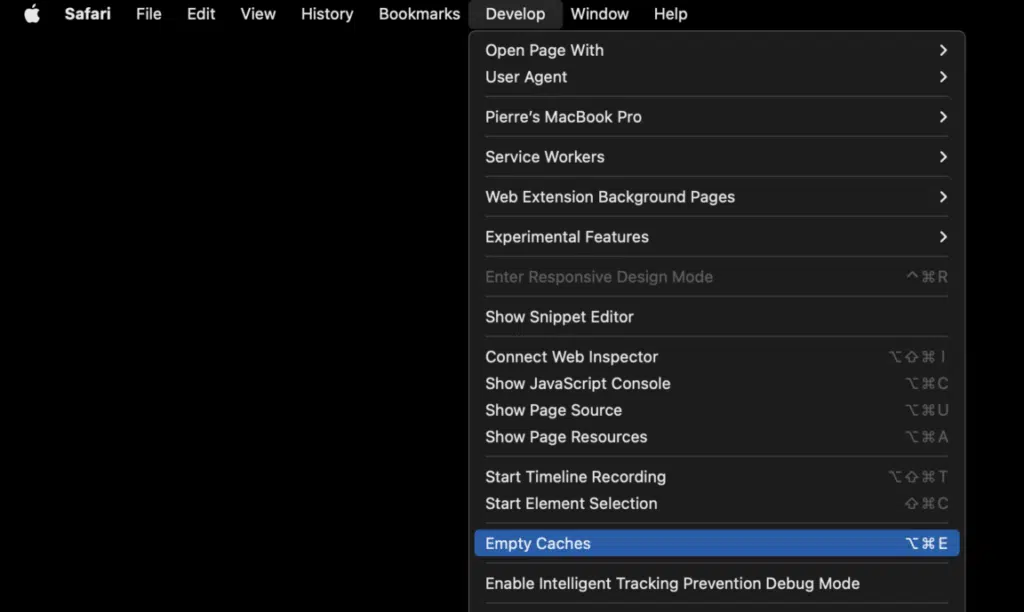
- Next, click on the Develop option in the top bar.
- In the drop-down menu, click on Empty Caches.
- Finally, please restart your browser as we detailed in Step 1 to ensure all changes take effect.
For Mozilla Firefox
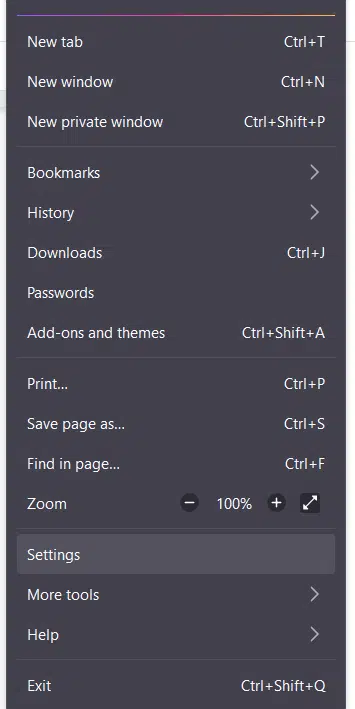
- Start by clicking on the hamburger icon in the window’s top right corner.
- Then, in the drop-down menu, select the Settings option.
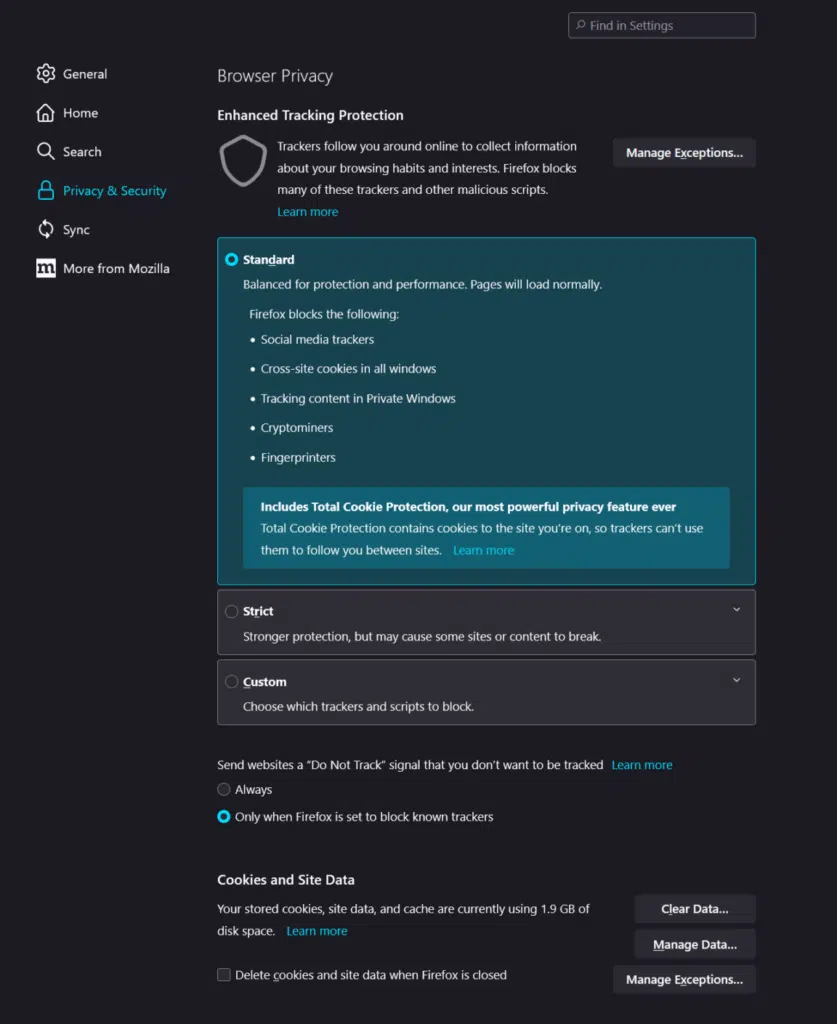
- Afterward, select the Privacy & Security tab in the newly opened Settings window.
- Under the Cookies and Data section, click on the Clear Data… button.
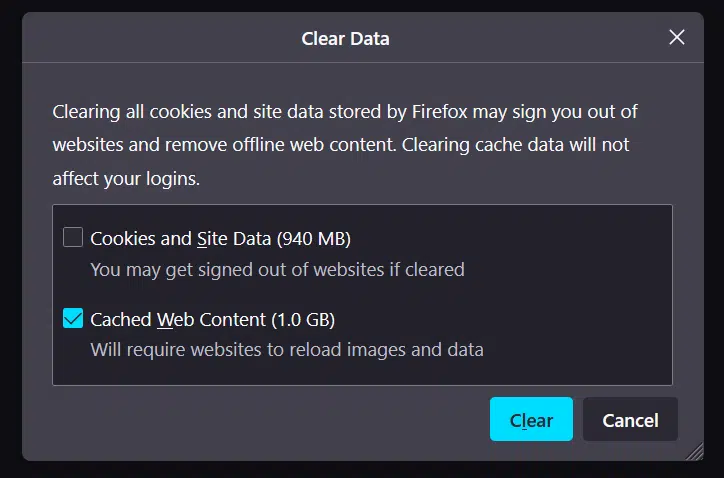
- Then, in the new popup window, ensure only the Cached Web Content option is ticked.
- Click on the Clear button to clear the changes.
- Finally, restart your browser as detailed in Step 1 to ensure all changes take effect.
And you’re done! Now all you have to do is to check if your comments load.
The Final Hope
But what if none of the solutions described above solves your problem? As a matter of fact, any WordPress plugin can malfunction, which means Disqus makes no difference.
If you did all you can, precisely as mentioned in this guide, there are two things left to do:
- Search for the solution in the Disqus forum. If you can’t find it, then post a thread regarding your specific problem. To do this, sign up for a Disqus account in the top right corner of the screen on the forum homepage. When your account gets approved, just create a new thread with your specific problem, and wait for answers to come.
- The other thing you could do is to contact their support directly and seek their help. However, to be able to talk to the support team, you must choose a paid membership that includes that option. The good news is that you’ll get a 30-day free trial, so it’s worth a try.
Conclusion
To sum up, our guide shows you exactly what to do if your Disqus comments won’t show or load on your WordPress website.
We covered six simple solutions. Hence, to make sure the solution will work, try your best to follow the steps described above, and don’t forget to save the changes made at each step.
Of course, we would gladly help you out just as well! Don’t hesitate to message us on our Services page.
Lastly, we’ll love to hear from you in the comments:
- Does your WordPress website fail to load Disqus comments?
- Did you find any of the above solutions useful?
- Do you have another fix we can add to the list?
Feel free to share this post with someone you know who has a WordPress website that fails to show Disqus comment


