


Unsure of how to add, import, connect, and use Bootstrap in HTML?
Do you want to create web pages that look good on any device and screen size? Do you want to use a framework that has hundreds of ready-made components and styles? If you answered yes to both questions, then this guide is for you.

In this guide, you will learn how to add and use Bootstrap in HTML with 3 methods.
Bootstrap is a framework for creating responsive web pages. It is a free front-end framework for faster and easier web development. It includes HTML and CSS based design templates for many components, as well as optional JavaScript plugins. Whereas HTML is a markup language for creating web pages. By using them together, you can create web pages that are attractive and adaptable.
Ready to get started? Let’s go!
Table of Contents
How to Add and Use Bootstrap in HTML?
To add Bootstrap to HTML, you can use one of the following three methods.
First Method: CDN Links
You need to add two links to your HTML document: one for the Bootstrap CSS and one for the Bootstrap JavaScript. You can find the latest CDN links on the official website.
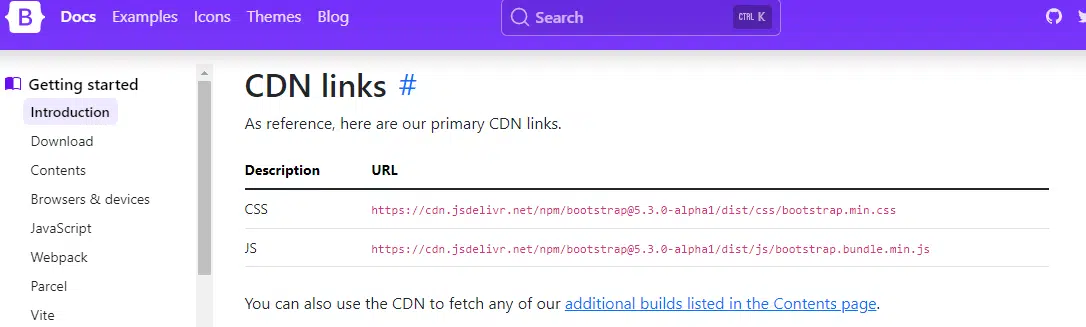
Here is an example of how to add them:
<head>
<!-- Bootstrap CDN links -->
<link rel="stylesheet" href="https://stackpath.bootstrapcdn.com/bootstrap/5.1.3/css/bootstrap.min.css">
<script src="https://stackpath.bootstrapcdn.com/bootstrap/5.1.3/js/bootstrap.bundle.min.js"></script>
</head>
This will load the Bootstrap CSS from a content delivery network (CDN), which means you don’t need to download or host any files on your own server. However, this also means that you need an internet connection to use Bootstrap, and you may experience some latency or performance issues depending on the CDN. Using a CDN means that you don’t have to download or update the Bootstrap files yourself. You just need to add a link to the CDN in your HTML document.
This can save you time and disk space, and also benefit from faster loading times and caching. However, using a CDN also means that you depend on an external service that may not be available or reliable at all times.
You also have less control over the version and customization of Bootstrap to use the Bootstrap components in your HTML, you need to add some classes and attributes to your HTML elements.
Second Method: Downloading the Bootstrap Files Locally
You can also download the files locally to your project folder from:
https://getbootstrap.com/docs/5.3/getting-started/download/
Once you download the file, you can include the bootstrap.min.css file in the <head> and bootstrap.min.js in <body>. Even if you are using the downloaded bootstrap file, you have to include jquery.min.js and popper.min.js before loading bootstrap.min.js.
This method can ensure that your website works even if the CDN service is unavailable. It can also give you more control over the files and allow you to customize them if needed. However, it also means that you have to update the files manually whenever there is a new version of Bootstrap. It can also increase your server load and bandwidth usage.
Third Method: Using Package Managers
Another way is that Bootstrap can also be easily pulled into any project using package managers such as ‘npm’, ‘yarn’ etc. Since npm is the most popular package manager used by front-end developers, we are going ahead with the npm command for installing bootstrap. Type the following command in your project folder (assuming you have initialized npm in the project):
npm install bootstrap
This command will download a local copy of bootstrap files inside the ‘node_modules’ folder in your project. You can then include the bootstrap.min.css file the <head> and bootstrap.min.js in <body>. As mentioned previously, you have to include jquery.min.js and popper.min.js before loading bootstrap.min.js.
This method can make it easier to install and update Bootstrap with a single command. It can also help you manage other dependencies and modules for your project. However, it also requires some knowledge and configuration of the package manager you are using. It can also add some complexity and overhead to your project.
Example of Using Bootstrap With HTML
For example, to create a responsive grid layout, you can use the following HTML code:
<div class="container">

<div class="row">

<div class="col-sm-4">Column 1</div>

<div class="col-sm-4">Column 2</div>

<div class="col-sm-4">Column 3</div>

</div>

</div>
The container class creates a fixed-width container for your content, the row class creates a horizontal group of columns, and the col-sm-4 class creates a column that spans 4 out of 12 grid units on small screens and above. There are many other Bootstrap components that you can use in your HTML, such as buttons, forms, navigation bars, modals, carousels and more.
How to Use Bootstrap Javascript Plugins With HTML?
If you only want to use the Bootstrap CSS styles, then you don’t need to add anything else other than the link tag. However, if you want to use some of the Bootstrap JavaScript plugins, such as modals, carousels, tooltips, etc., then you need to add some additional scripts to your HTML file.
First, you need to add a script tag for jQuery, which is a JavaScript library that Bootstrap depends on. You can use a CDN link like this:
<script src="https://code.jquery.com/jquery-3.3.1.slim.min.js"></script>
Then, you need to add a script tag for Popper.js, which is a library that provides positioning and tooltips for Bootstrap. You can use a CDN link like this:
<script src="https://cdnjs.cloudflare.com/ajax/libs/popper.js/1.14.7/umd/popper.min.js"></script>
Finally, you need to add a script tag for Bootstrap.js, which is the main JavaScript file for Bootstrap. You can use a CDN link like this:
<script src="https://stackpath.bootstrapcdn.com/bootstrap/4.3.1/js/bootstrap.min.js"></script>
You should add these script tags at the end of your <body> tag, after any other content. This will ensure that your page loads faster and that the Bootstrap plugins work properly.
Conclusion
In this guide, you have learned how to add the Bootstrap and use the Bootstrap classes and components in your HTML code.
Now you can create web pages that are responsive and stylish using Bootstrap and HTML. You can also explore more Bootstrap features and components by visiting the official Bootstrap website or reading the Bootstrap documentation. You can also learn more about HTML by visiting the official HTML website or reading the HTML documentation.
Happy coding!
Feel free to share this post with web developers who need help with Bootstrap! 😊