


Want to learn how to install the Arch Linux operating system on your device? Look no further, as this is a complete guide detailing all the steps to download, install, and set up Arch Linux to your liking!
Table of Contents
- What is Arch Linux?
- Should You Consider Using Arch Linux?
- Content
- Prerequisites
- Preinstallation
- Arch Installation Using Archinstall Script
- Controls
- Step 4: Archinstall Language and Keyboard Layout
- Step 5: Mirror Region
- Step 6: Locale Language
- Step 7: Locale Encoding
- Step 8: Drives
- Step 9: Bootloader
- Step 10: Swap
- Step 11: Hostname
- Step 12: Root password
- Step 13: User Account
- Step 14: Profile
- Step 15: Audio
- Step 16: Kernels
- Step 17: Additional Packages
- Step 18: Network Configuration
- Step 19: Timezone
- Step 20: NTP Automatic Time Sync
- Step 21: Optional Repositories
- Step 22: Finalize Installation
- Arch Installation using Terminal Commands
- Step 4: Synchronise System Clock
- Step 5: Format Block Storage Volumes
- Step 6: Install Base Arch Packages
- Step 7: Generate fstab File
- Step 8: chroot into the Arch Linux Install
- Step 9: Create Swapfile
- Step 10: Configure Localization
- Step 11: Set Up Host Settings
- Step 12: Install CPU Microcode
- Step 13: Install and Enable NetworkManager
- Step 14: Install and Configure systemd-boot
- Step 15: Set Up New User
- Step 16: Finalize Installation
- Post Installation
What is Arch Linux?
Suppose you’ve delved into the rabbit hole that’s Linux, even if just as a beginner, you might have heard about Arch Linux. Arch Linux is a massively popular Linux distribution known among the community for giving you insane customizability and control over the operating system.
When you install Arch Linux onto your system, you get a barebones installation of a Linux OS. Only the bare minimum of packages are established for a computer to function — there’s no desktop environment (DE), just the CLI. Want to browse the Internet? You’d first have to install a DE and then your browser of choice.
The Arch User Repository (AUR) is an indispensable asset to have. It’s only available for Arch-based distros, and it has pretty much any package (software or application) that you may want or need already pre-compiled for you.
Similarly, for me, I also like the DIY aspect of the distribution. In the same vein, since the kernel is essentially just another package, we also have complete control and customizability over the kernel! Overall, it allows the installer to keep a minimal footprint, not only in install size but also in terms of system resources.
Another cool thing about Arch Linux is that it’s a rolling release distro. In other words, this means that Arch Linux is constantly being updated and has no different, distinct ‘versions.’ Additionally, Arch Linux is famous for having the latest Linux kernels. Arch Linux typically gets it within a day or two when a new Linux kernel comes out.
This is in contrast to other popular Linux distros like Ubuntu. Ubuntu ships with a ‘batteries included’ approach. Hence, when you install Ubuntu, you have nearly all the tools you’ll ever want to do your work, whether you need them. Moreover, every six months, there’s a new release of Ubuntu, unlike Arch Linux.
Should You Consider Using Arch Linux?
Based on all the information discussed in Arch Linux, it’s safe to say that Arch Linux is firmly aimed toward power users and tinkerers who are willing to spend quite some time adjusting and customizing Arch Linux to be your OS. Arch Linux is sure to be a blast if that sounds like you!
I wouldn’t recommend Arch Linux to any newcomers to the Linux world as they’d have to know what packages to install in the first place, which is something one picks up as they use a more newcomer-friendly distro. If you’re not ready to try Arch Linux yet, but you have intentions of moving over to Arch Linux shortly, I highly recommend EndeavourOS. EndeavourOS is a distro based on Arch Linux and can essentially be described as Arch Linux with an easy-to-use GUI installer! Hence, you’ll also get access to all the packages in the AUR.
I chose Arch Linux as my operating system due to its adherence to the ‘Keep It Simple, Stupid’ (KISS) principle. I find that this resonates with me since I only want the things I need and nothing else. I get to choose what packages I wish to install with little to nothing imposed on me.
Regardless, if this is your first time installing Arch Linux, I recommend trying it out on a virtual machine first. That way, you’ll know if it’s your cup of tea without risking all your data.
Note: If you know a thing or two about other Linux distros, it can be argued that Void Linux or Artix Linux would serve the same purpose. Their main appeal would be the lack of systems, but I frankly find that in my experience, systemd works fine, but I digress.
Content
As Arch Linux can be customized to whatever use case you have for it (I have even used it for my home server!), this article will detail how to replicate my current configuration for a personal desktop OS using the terminal and GUI tools. As such, basic Linux knowledge will be required on your end if you wish to adjust it to your needs. Moreover, I may also explain the rationale behind my confident choices, which in turn may better inform you about whether to choose a different path than I have.
The article will be split up into three main sections:
- Preinstallation
- Necessary tools and items you’ll need to install Arch Linux
- Base Arch Installation
- Either installing it with the guided ArchInstall script or,
- Optimally install and set up Arch Linux as fast as possible using the traditional terminal method
- Post Installation
- Possible modifications to the Arch Linux installation, including my favorite configurations and apps
By the end of this guide, you will have an Arch Linux installed with:
- A UEFI boot partition using systemd-boot
- An ext4 formatted Arch Linux filesystem
Do note that I cannot guarantee this guide’s compatibility with all systems due to all the possible combinations of hardware available on the market.
Prerequisites
To install Arch Linux for 64-bit systems, much like other distros, you’ll need the following for your computer:
- A 64-bit compatible CPU
- 512MB of RAM
- A motherboard that supports UEFI
- 1GB of free disk space
- An active Internet connection via Ethernet
- A USB Drive with at least 4GB of storage
- A keyboard
- A monitor
Preinstallation
Before we get started with the installation, you’ll need to do the following using another computer:
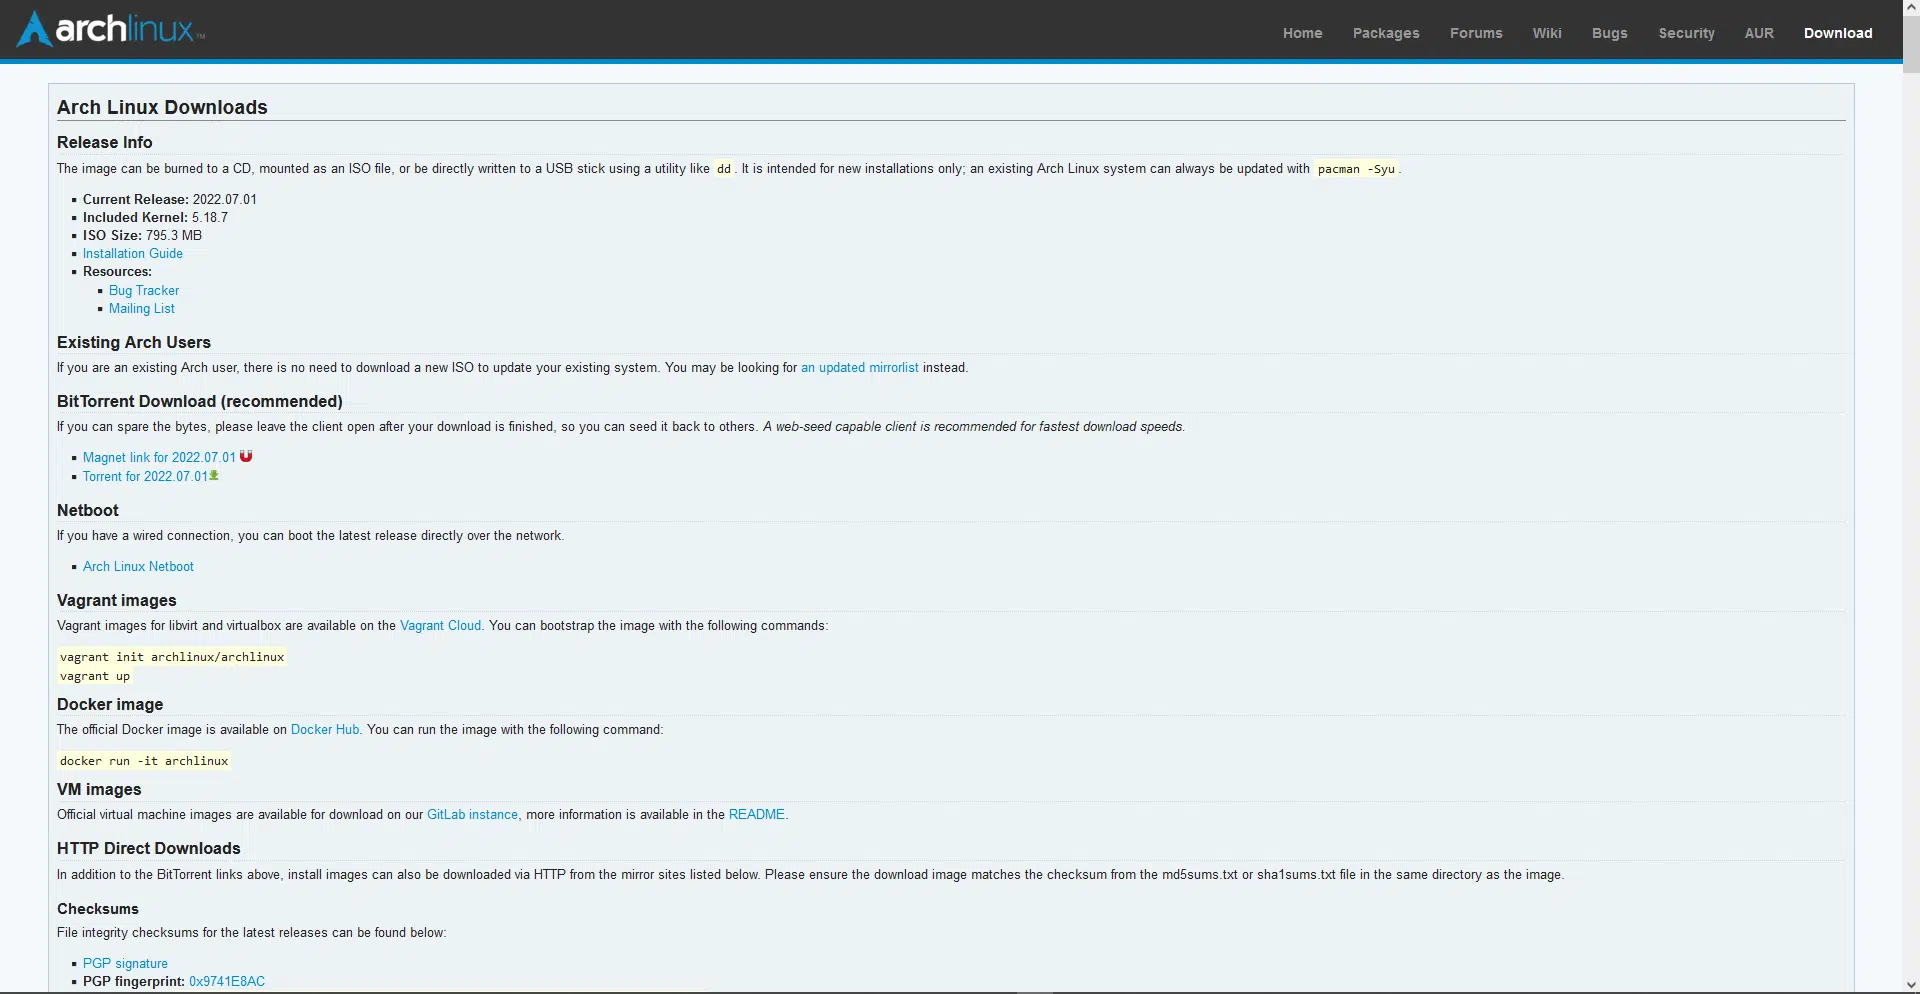
Step 1: Download the Latest Arch Linux ISO File
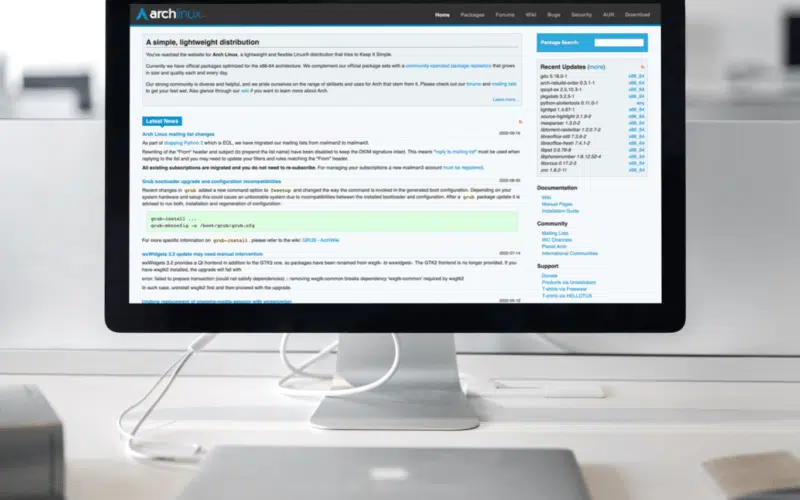
Download the latest ISO for Arch Linux from the official website here.
Step 2: Burn the ISO File onto a USB Drive
Linux
Right-click on the ISO file in the Nautilus file manager and use the Disk Image Writer to burn it onto the USB stick. Alternatively, you may also use Balena Etcher.
Windows/macOS
You’ll need to download a program to burn the ISO to your USB drive. I use Rufus, but Balena Etcher is another popular option, especially since the GUI is far more modern and friendly than Rufus’.
Step 3: Boot from the Formatted USB Drive
- First, ensure the target PC is switched off.
- Then, plug the formatted USB drive into the PC.
- After that, power on the PC.
- Next, enter the BIOS of the PC. This is usually accessed by repeatedly pressing the Delete or F12 key on your keyboard upon bootup.
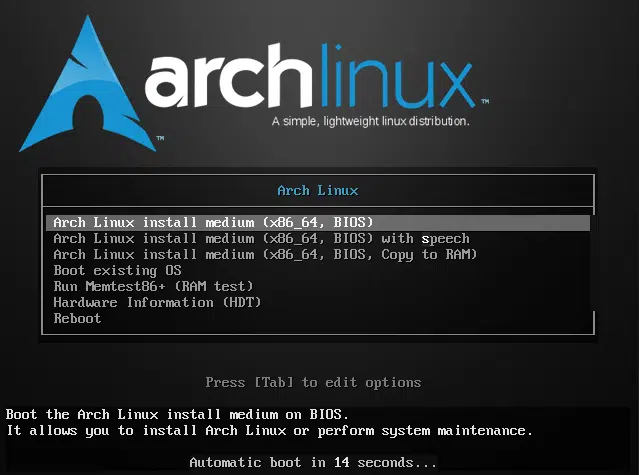
- The BIOS overrides the boot order and boots from the plugged-in USB drive.
- Then, select the first option in the boot menu for the Arch Linux installer, Arch Linux install medium (x86_64, BIOS).
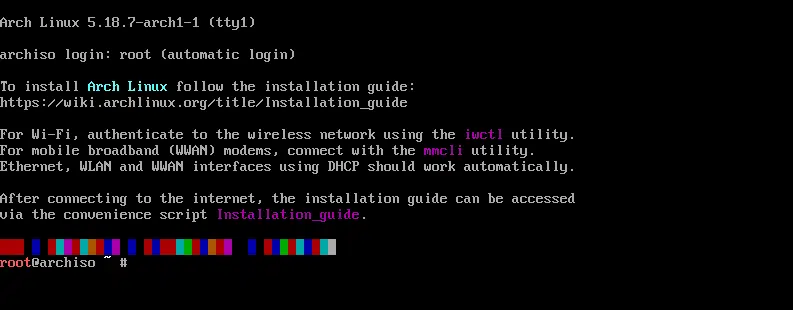
The Arch Linux installer logs everything it’s doing upon bootup, but after that, you should be greeted with the terminal.
Arch Installation Using Archinstall Script
If you don’t have an hour or two to dedicate to learning to install Arch Linux the traditional way using commands, you can use archinstall instead. Recent versions of the Arch Bootable ISO come preinstalled with it, allowing you to pick and choose what options you’d like for your installation of Arch without manually issuing all the commands. I have to say, it’s pretty impressive and allows you to get up and running with a good install of Arch Linux rather quickly.
However, there is still a place for the conventional method of installing Arch since you have all the options you could want when installing Arch. Plus, it’s a great way to learn about how Linux systems, in general, are structured, as well as inform you on what exactly your system is.
Regardless, this is how to use the Archinstall script to install Arch Linux.
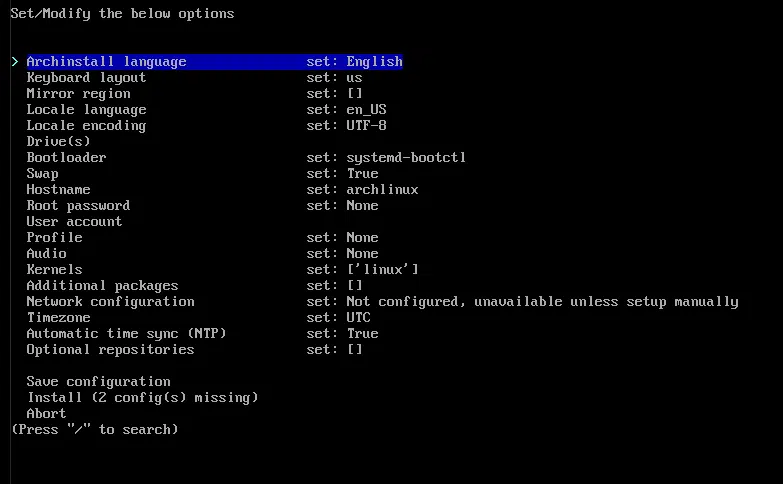
We’ll need to boot up the ArchInstall program, and you can do so by entering the following command:
archinstall
After doing so, you should be greeted with the next terminal UI:
Controls
Since we’re using this UI purely with a keyboard, here’s a cheat sheet for the controls:
| Function | Keypress |
| Navigation | Arrow Keys (Up and Down) |
| Select | Enter |
| Back | Escape |
| Reset Selection | Ctrl + C |
| Search | Forward Slash |
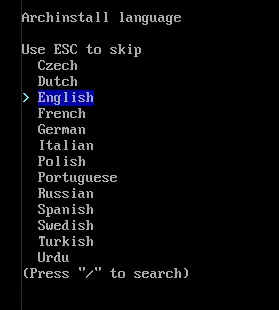
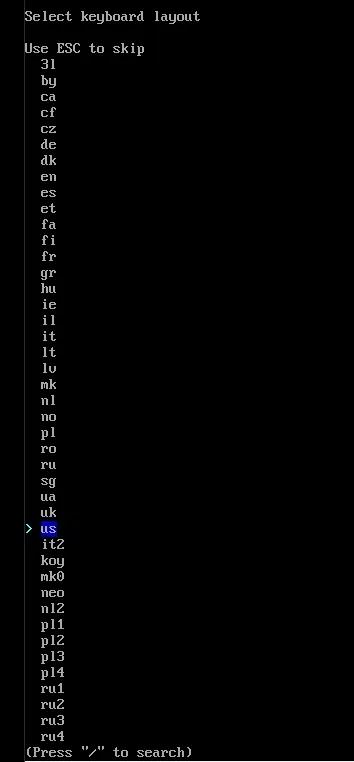
Step 4: Archinstall Language and Keyboard Layout
The first two options are regarding the ArchInstall script’s language and the layout of your keyboard. This one is self-explanatory; you should change it to whatever language you prefer and the design of your keyboard, respectively. There are a lot of possible keymaps for the keyboard layout, though, and the naming is somewhat arbitrary, so take your time with that one. Most English keyboards are either ANSI US, the default, or ISO for British keyboard layouts.
Step 5: Mirror Region
Arch Linux hosts its packages and their downloads on various servers worldwide. These servers are called mirrors since they mirror or replicate the contents of each other — you’ll get the same content no matter what server you connect to. There are two main advantages to doing this: redundancy and lower latency.
The redundancy aspect is good since you can access Arch packages even if the server you’re connected to is having issues. The other advantage is having lower latency since you’re likely to find a server that’s physically closer to you, which will result in a better connection.
We’re interested in that second advantage right now, so we’ll need to choose the region that’s geographically closest to you to get the fastest downloads. Of course, if the downloads seem relatively slow later, you can try again with another immediate region.

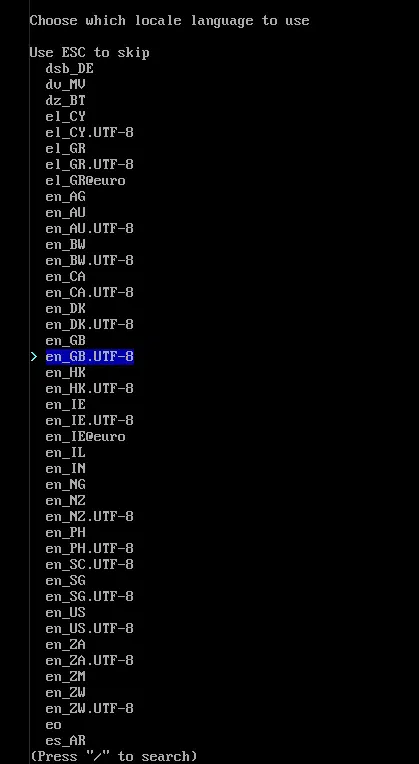
Step 6: Locale Language
This setting is what you want the installed Arch’s language/locale to be. This differs from the earlier setting because Archinstall language only changes the installer’s language.
When choosing your locale, it’s highly recommended to select the UTF-8 variant of the locale if available. The first two lowercase letters represent the language, while the last two uppercase letters represent the region of that language—for example, en_GB.UTF-8 would be the UTF-8 variant of the English language in Great Britain.
Other than that, it’s pretty much just whatever language you want.
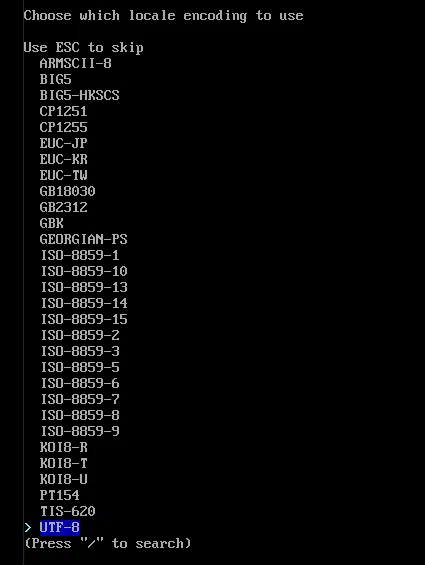
Step 7: Locale Encoding
This one mainly boils down to two options. If you chose a UTF-8 variant for your locale language in the previous step, you’d need to select the UTF-8 locale encoding. If you chose a locale language without UTF-8 appended, you’d need to select ISO-8859-1. Otherwise, if you chose a more obscure locale language, you might be familiar with what locale encoding to choose.
Step 8: Drives
Here, we’ll choose what drive to install Arch Linux into. You might be presented with a plethora of different disks with varying names and sizes, so you’ll need to know which one is the drive you’d like to install Arch into just from that information.
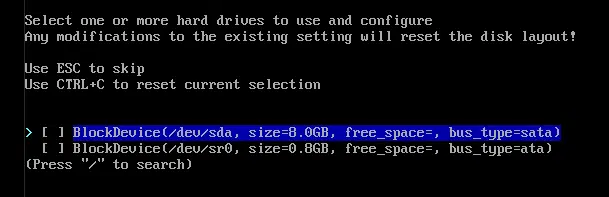
To give you an idea of how Linux names its block storage devices, SATA devices are formatted as sdx, whereas NVMe drives are formatted as nvmex, where the x increases depending on how many industries you have connected.
If you’re still unsure which drive is which, I advise you to abort the installation process and shut down the PC to physically remove the purposes from your computer that you’re not going to install Arch Linux onto. That way, only the drive you want will show in the interface. After installation, you can physically reconnect the other storage drives and set them up later.
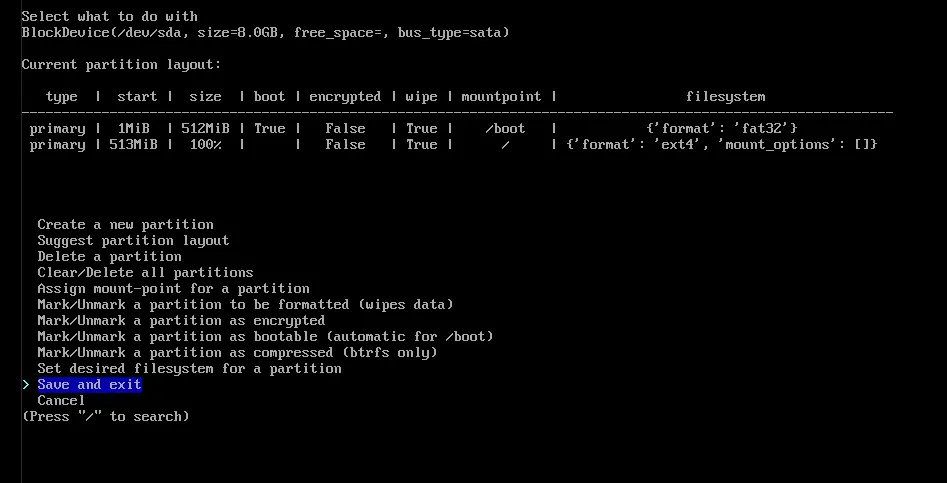
Disk Layout
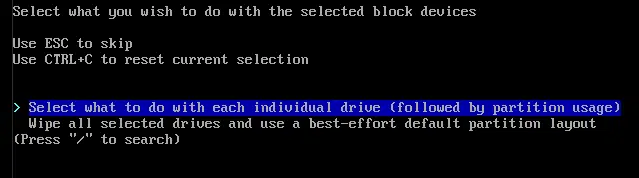
After selecting your drive, you’ll need to format them however you see fit.
- To start, we recommend you choose the first option, Select what to do with each drive (followed by partition usage).
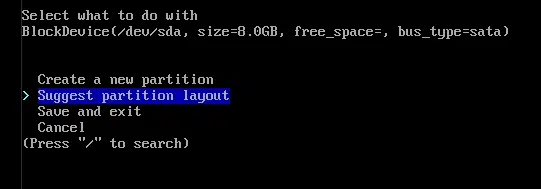
- Then, select Suggest partition layout.
- After that, choose ext4 from the list.
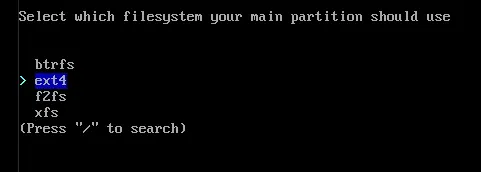
- You should then be greeted with an overview of how your drive will be partitioned. The defaults are already pretty good!
- If you’d like to change anything about the partitions, now’s the time.
- Finally, select Save and Exit.
Encryption Password
Encrypting your drive adds an extra layer of security. If set up, you’ll need to enter your drive’s password before your system can even boot. Additionally, if someone were to take your drive physically, they wouldn’t be able to access your data since it has been encrypted. So, if you’d like to set this up, simply type in your password into the terminal.

Do note that your password or whatever you type will not show up. This is perfectly normal and is done to keep your password private as a form of security. Rest assured that your password is still actually getting registered into the terminal.
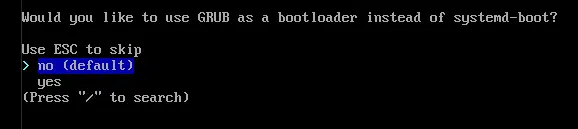
Step 9: Bootloader
The next thing to set up is the bootloader. The bootloader allows you to choose what specific Linux kernel, or OS for that matter, you want to boot into when you start up your PC. By default, Archinstall chooses systemd-boot as the bootloader, and it’s what we’re going to choose for this install. It’s far more minimal than the other option, the Grub bootloader, and doesn’t come with bloatware that mimics Arch Linux’s philosophy.
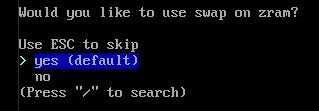
Step 10: Swap
Next up is a swap. Swap is what the system will use when it runs out of system memory, your RAM. Your system needs to have swap since it will slow down to a halt if your system memory ever gets full. Yes, swap is much slower than RAM since it typically uses your drive, but it’s better than not having it at all.
Archinstall’s implementation of swap is zram which is faster than having swap in your storage drives since it just compresses the data instead of moving it to your storage drives. The disadvantage is that it uses your CPU’s resources to decompress the file.
Regardless, we recommend you set the Swap value to true:
Step 11: Hostname
This one is pretty straightforward. The hostname is what your PC’s name will be. Here, I’ve named it pierre:
![]()
Step 12: Root password
The root user is essentially the user on the PC with the privileges and permissions to do whatever to the system. If left blank, it will disable root, which is not what we want. Hence, we highly recommend you put a password for the root user. You’ll have to enter it twice as it will ask you to repeat the password later on.

As for the option for encrypting your drive with a password, whatever you type here will not show up but is being registered. This is by design since it keeps your password private and away from any prying eyes.
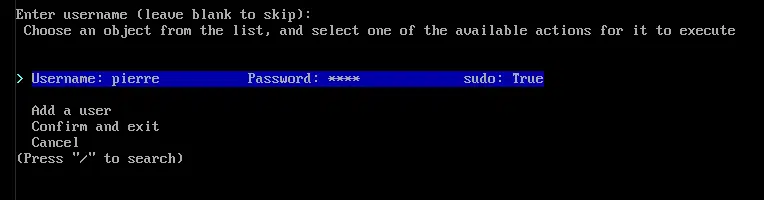
Step 13: User Account
For this step, we’ll be setting up the user account, the account you’re going to log into and use:
- First, enter the username you want.
- Then, type in your desired password.

- After that, you’ll be asked to repeat the password.
- Next, be sure to select yes when asked if the account should be a superuser. This is so that you can execute commands that require sudo privileges.
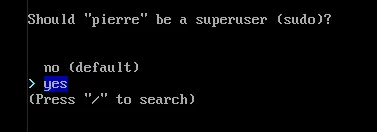
- On the newly opened page, you can either Add a user (which repeats steps 1 – 4) or just Confirm and exit with the users shown in the table.
Step 14: Profile
The next part is about the ‘Profile’ of your installation. What Archinstall means by ‘Profile’ in this case is essentially what preset you want for your install. There are four types of profiles available for you to choose from, each with a brief explanation of what they do:
- Desktop
- Minimal
- Server
- Xorg

If you plan to install Arch Linux alone — a pure Arch Linux install — then you’d want to choose the minimal install. This will most closely mimic the kind of install detailed in the manual install of Arch Linux.
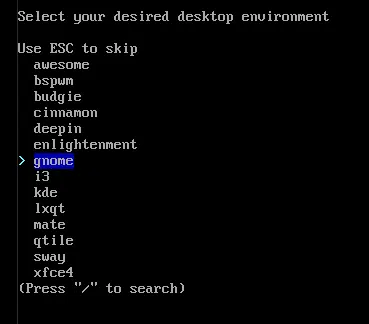
If you plan to install Arch Linux for desktop use with a DE such as Gnome or KDE, then you should choose the desktop install.
First, you need to select your desired DE:
After that, you’ll need to choose the appropriate video drivers for your system.
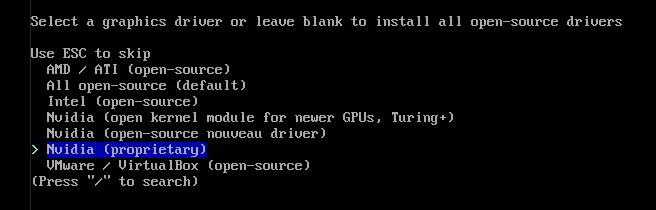
If your system has an AMD GPU, you’ll need to select the first option, AMD / ATI (open-source). If you’re running on Intel’s GPUs, you’ll want to install the Intel (open-source) drivers. Finally, if you have an Nvidia GPU on your PC, you will have to select the Nvidia (proprietary) drivers. This is because they provide much better performance when compared to open-source Nvidia drivers.
Do be aware that DE installs with this method are not minimal and will install all packages that are tied to that DE whether you need them or not. If you want a minimal Gnome install, choose the minimal install here and follow the Gnome install guide in the Post Installation section.
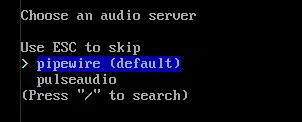
Step 15: Audio
The audio option allows you to choose pipewire or pulseaudio as your audio framework server. The default choice of pipewire is pretty good, so we’ll leave it at that.
Step 16: Kernels
Now, onto the crux of Arch Linux, the kernel. Here, Archinstall gives you four options:
- linux (default)
- linux-hardened
- linux-lts
- linux-zen
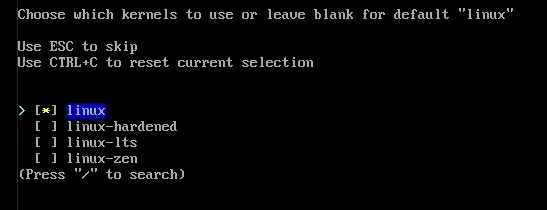
For most people, linux, the default option, will work pretty well as it’s a refined version of the Linux kernel. On the other hand, linux-hardened is a security-focused version of the kernel, while linux-lts prioritize stability over bleeding edge features. Finally, linux-zen, my favorite, adds some performance enhancements to the kernel at the cost of slightly increased power usage.
It’s up to you what kernel you’d like to use, but we’ll be installing linux since it most closely mimics the install done in the manual method. Regardless, if you change your mind later on, we’ll be able to install any of the other kernels listed here easily. A handy tutorial to do so is available in the Post Installation section.
Step 17: Additional Packages
If you have other packages in mind that you’d like to install, such as your favorite apps or services, now’s the time. No idea about what packages to install? You can refer to the Post Installation section, where I list my favorite boxes. Nevertheless, this step is optional, so feel free to leave the list blank.

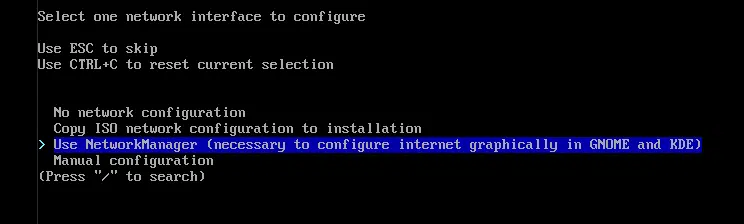
Step 18: Network Configuration
This one is a critical step if you’re planning to install a DE on this install. If you are, you’ll need to choose the Use NetworkManager option. As it states, it’s necessary if you want to set up your Internet connection graphically in either Gnome or KDE.
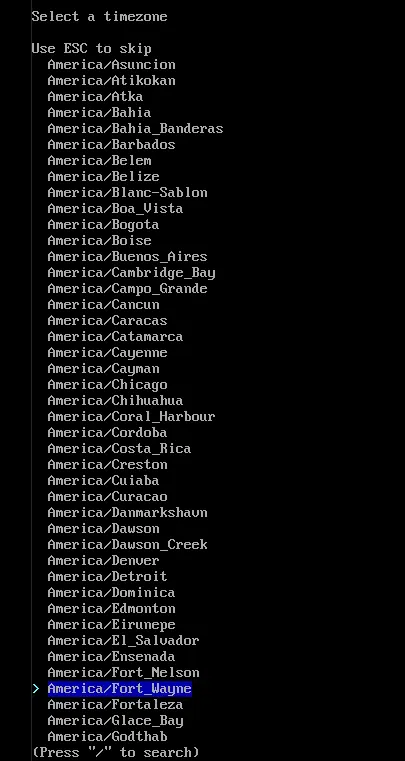
Step 19: Timezone
As for the timezone, this one is pretty self-explanatory. Just choose the region that best matches your geographical location.
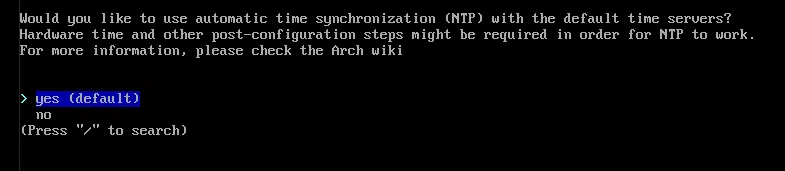
Step 20: NTP Automatic Time Sync
This option keeps your system time in sync with other computers using the Network Time Protocol. It’s best to leave this one on its default, true.
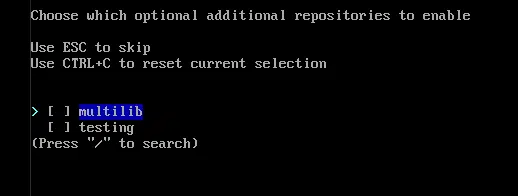
Step 21: Optional Repositories
Now, at the final configuration step, optional repositories. There are only two options here, multilib and testing. We recommend enabling multilib as an additional repository as there are quite a few useful packages on there. As its name suggests, the testing repository is only for testing packages, so they’re not exceptionally stable enough for daily use.
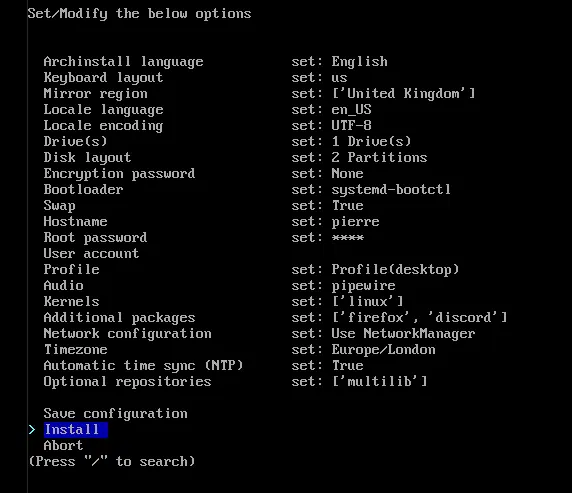
Step 22: Finalize Installation
And that’s pretty much it! After reviewing your chosen settings, you can either save this configuration or go right ahead and install it with the last few options in the interface.
After choosing Install, you’ll be presented with a JSON representation of your installation settings. Then, you can just hit Enter on your keyboard to proceed.
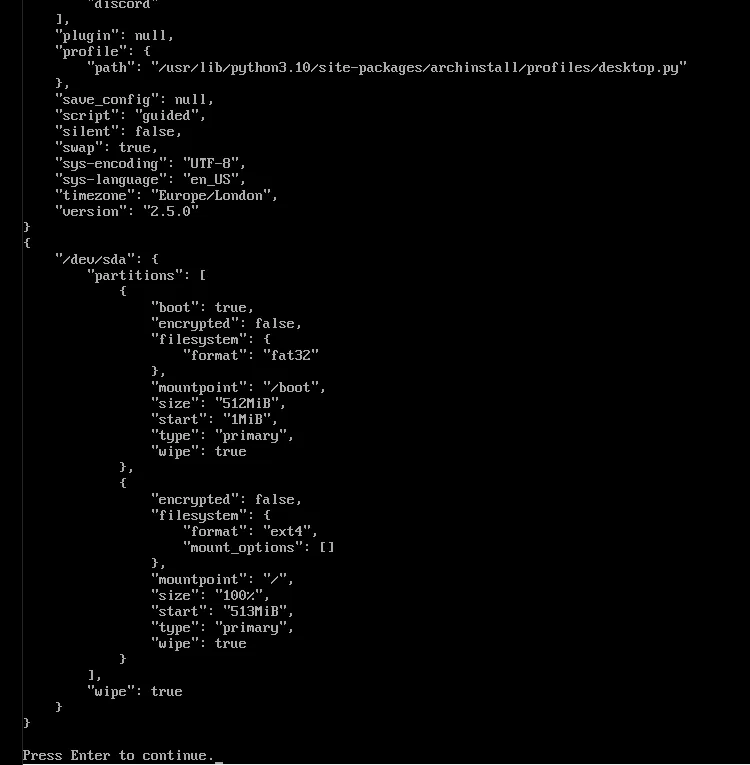
It’ll take some time for it to do its thing and install Arch Linux, so feel free to do something else in the meantime. When you come back, however, it will ask you if you would like to chroot into the new installation. It’s not necessary in our case, so select no.

After that, you can reboot! You can just enter either reboot or shutdown now to reboot the PC or shut it down. Of course, you’ll need to make sure you choose the new install in your BIOS upon bootup so that it doesn’t boot into the live ISO again.
Arch Installation using Terminal Commands
Of course, if you already have a base Arch install, you can skip to Post Installation.
Many thanks to Ermanno and his video on How to install Arch Linux with the systemd-boot bootloader. It will form the basis of this installation guide and has been adapted accordingly. For additional information, consult the fantastic Arch Wiki install guide.
Tip: From this point onwards, you’ll be issuing a lot of commands in a terminal, so it can get very cluttered and messy rather quickly. You can clear the terminal by either typing in the console:
clear
Or by pressing Ctrl + L on your keyboard.
Step 4: Synchronise System Clock
This can be done with the following command in the terminal:
timedatectl set-ntp true
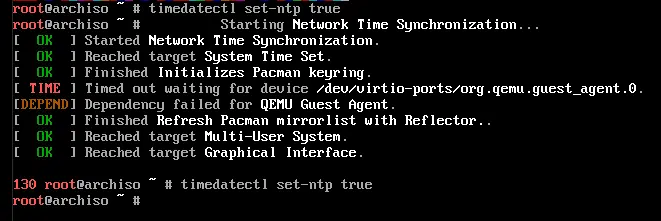
Sometimes, this command may take quite a while to execute — it should only take about a few seconds. If you see that it has Reached the target Graphical User Interface, then it’s pretty much done. You may simply force-stop the operation by pressing Ctrl + C on your keyboard. Then, if you rerun the command, it will most likely complete quickly.
Step 5: Format Block Storage Volumes
Any operating system requires storage devices to be formatted before they can be used. All brand new drives aren’t formatted, so this step is typically done by Windows in the Windows GUI installer. However, since this is Arch Linux, as mentioned previously, this will be done manually in the terminal.
In this section, I’ll be formatting the main drive into two partitions. The first partition is the EFI partition which is used to boot into Arch Linux. Then, the second partition is the rest of the drive, which is where we can store system files and our personal files. The second partition is also where we will put a swap file.
First, we’ll need to list all the drives connected to your PC. That can be done with the lsblk command:
lsblk
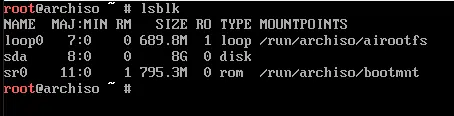
Here, we can see that we have an 8GB disk drive connected to our PC with the name sda. This is where I’m going to install Arch Linux. SATA devices are formatted as sdx, whereas NVMe drives are formatted as nvmex, where the x increases depending on how many drives you have connected.
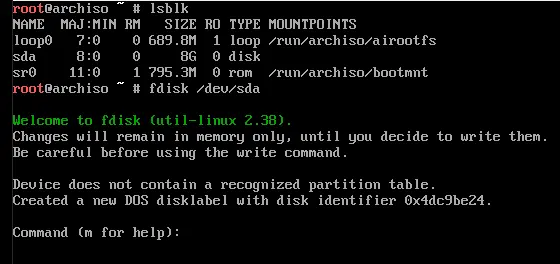
fdisk into your desired drive by passing /dev/NAME as an argument where NAME is the name for your disk drive.
fdisk /dev/sda
Once you’re in the fdisk interface, if you need help, you can consult the help menu with m.
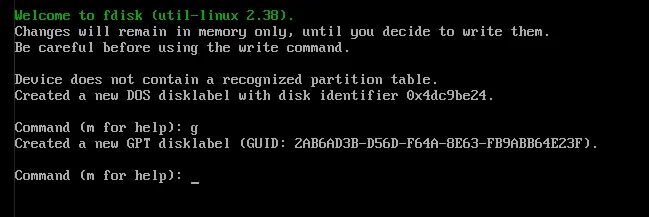
Then, you’ll need to format your drive as GPT by entering g.
g
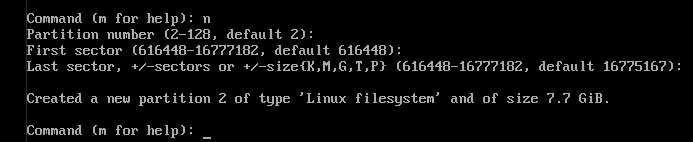
Create EFI Partition
Now, create a new 300MB EFI partition using default partition numbers. After issuing the n command, a list of prompts will be shown to you, and the following values need to be passed to the system. use default refers to simply pressing the Enter key on your keyboard to use the default value.
n
use default

use default
+300M

t

1
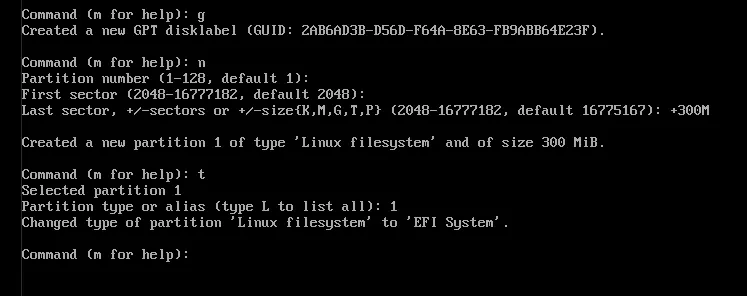
Of course, if you’d like to change any of these options, you can follow the prompts, such as typing L to list all the types of partitions available.
Create Filesystem Partition
Next, partition the rest of the block device as regular Linux filesystem storage.
n
use default
use default
use default
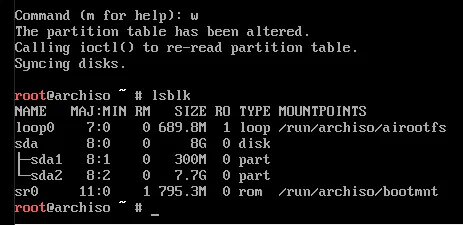
Once that’s done, we can write changes to the block storage device. This is because fdisk does not immediately apply the changes you have specified after hitting the Enter key — the changes are stored in memory as mentioned when we first opened fdisk. It’s only done at this step when you enter w. After that, we can verify the new partitions with lsblk.
w

lsblk
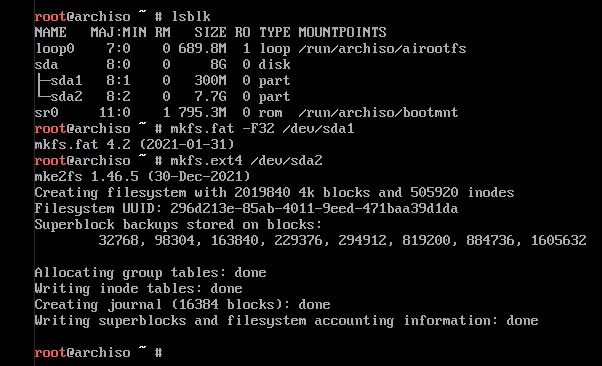
Reformat Partitions
Now, we need to make the EFI partition a FAT32 and Linux file system partition into an ext4 filesystem. Of course, you’ll need to refer to the NAME column in the lsblk output to determine which one is your EFI partition and your filesystem partition.
mkfs.fat -F32 /dev/sda1
mkfs.ext4 /dev/sda2
Mount Partitions to Live Boot USB
The next step is to mount the EFI and Linux filesystem partitions into the live boot USB. As usual, we’ll use lsblk to verify the changes.
mount /dev/sda2 /mnt
mkdir /mnt/boot
mount /dev/sda1 /mnt/boot

lsblk
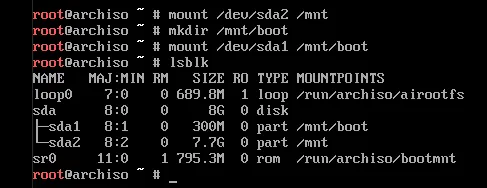
Here, what we’re doing is mounting the Linux filesystem partition into the root directory of the actual drive where we want to install Arch Linux onto. This can be observed by the value of the MOUNTPOINTS column of the lsblk output. The same is done for the EFI partition as well.
Step 6: Install Base Arch Packages
First, install the essential base packages. This step might take some time, depending on your storage device’s speed and Internet connection speed. Luckily all the progress is shown, so you will know the progress at all times.
pacstrap /mnt base linux linux-firmware vim nano
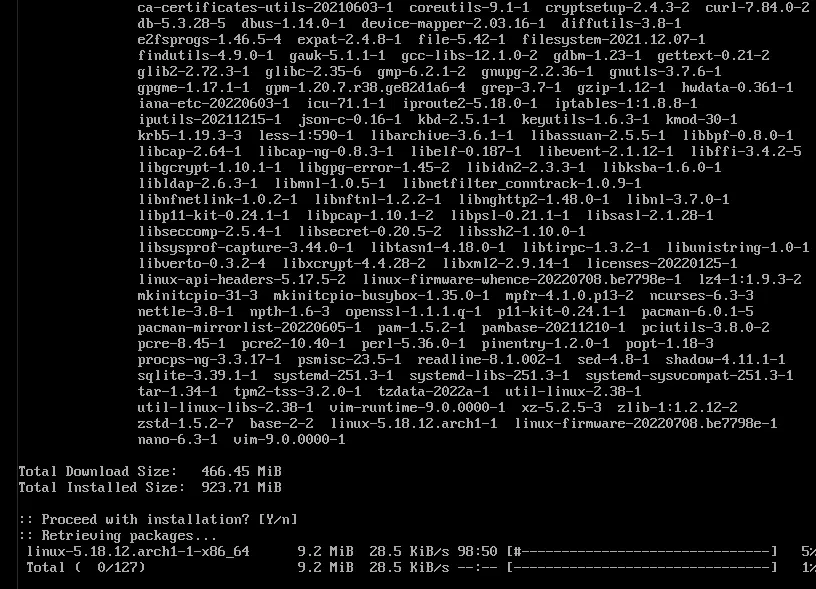
Basically, we’re telling the bootable Linux drive to install base, linux, linux-firmware, vim, and nano into the computer’s storage device. This will install the base package of Arch Linux, which consists of all the essential packages for running Arch Linux, the Linux kernel itself, and its firmware, as well as vim and nano, which we can use to edit files.
If you’re not used to vim, you may use nano instead. It has more traditional controls and may be more up your alley, especially if you’re a beginner.
Installation Issues
One of the problems you may come across when installing these packages are issues with “signature is marginal trust”, “signature is unknown trust”, or “invalid or corrupted package”. If this happens to you, you may try the following commands one after the other, after which you can retry the pacstrap command we mentioned.
pacman -Sy archlinux-keyring
rm /mnt/var/cache/pacman/pkg/*.part

pacman-key --refresh-keys
The first command basically updates the Arch Linux keyring, which basically ensures that the files you download from the Arch Linux repository are legitimate and have not been tampered with. Typically, this command is enough to resolve the issue.
The second command deletes any downloaded packages in your PC’s storage that are only partially downloaded — corrupt, unusable files.
The last command is essentially a manual, a more time-consuming method to perform the first command. However, it may be necessary to do so in the event that the first command doesn’t help.
Step 7: Generate fstab File
For the next step, we’ll need to generate a fstab file using our storage devices’ UUIDs. fstab is short for file systems table if you were wondering. Of course, we’ll verify it is actually written into the file by using the cat command.
genfstab -U /mnt >> /mnt/etc/fstab
cat /mnt/etc/fstab
The fstab file essentially tells Linux about what each of the drives and their partitions is for upon bootup.
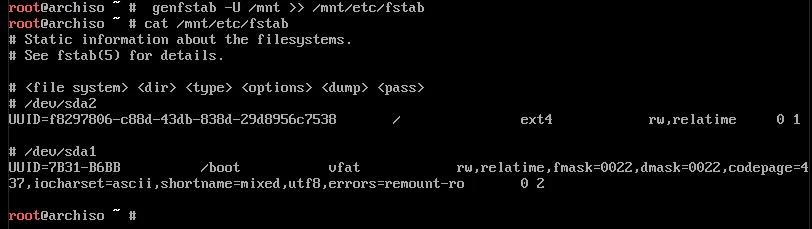
Basically, what you’re looking for is that the file isn’t empty and has values for both of your partitions.
Step 8: chroot into the Arch Linux Install
Now, we’ll need to chroot into the installation.
arch-chroot /mnt
So, all this time we have been issuing commands from the Arch Linux bootable USB, but by chroot’ing into our PC’s storage device, we can issue commands from the PC’s Arch Linux install itself, even though we’re still running on the bootable USB. Pretty cool!
Step 9: Create Swapfile
Back to some storage stuff, we’ll need to create a swapfile in the root directory.
Seeing as most installs are on SSDs, a swap file was chosen instead of a swap partition since the file can be managed and shuffled around by the SSD throughout the whole partition to evenly wear the SSD. This is not possible with a swap partition since the file is limited to those block locations, thus wearing down that specific area more.
Write Swapfile
This is the command you’ll need to write a new swapfile:
dd if=/dev/zero of=/swapfile bs=1M count=512 status=progress

In this example, I made it 512 megabytes or 512M. You can change this to however much you see fit, of course. For example, if you wanted 2 gigabytes or 2G, you’d simply change the arguments for bs= and count= to 1G and 2, respectively. bs stands for block size, and the count is self-explanatory. Of course, you could also do it as bs=1M and count=2048, but you’ll still reach the same result.
Format Swapfile
Now, we’ll need to set permissions, format, and activate the newly created swapfile.
chmod 600 /swapfile

mkswap /swapfile

swapon /swapfile

The first command basically gives the owner of the file and only the owner of the file (i.e., you) permission to write to the file. The other two are self-explanatory — turning the swapfile into the proper format and then turning on the swap feature using that file, respectively.
Update fstab
Moving on, we’ll have to edit the fstab configuration to support the swapfile. To do so, feel free to use nano or vim.
nano /etc/fstab
Basically, you’ll want to enter the following arguments into the file in a new line:
/swapfile none swap defaults 0 0
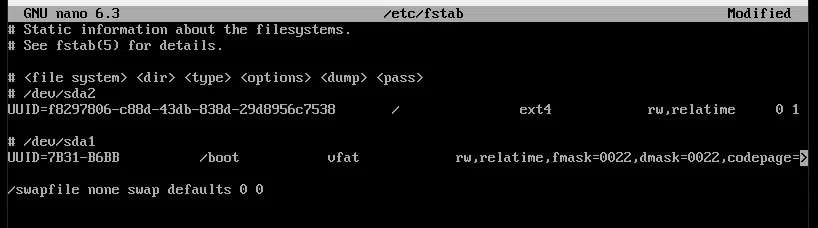
You can save and exit nano by holding down CTRL + X on your keyboard, then pressing y, and finally hitting Enter to save the filename.
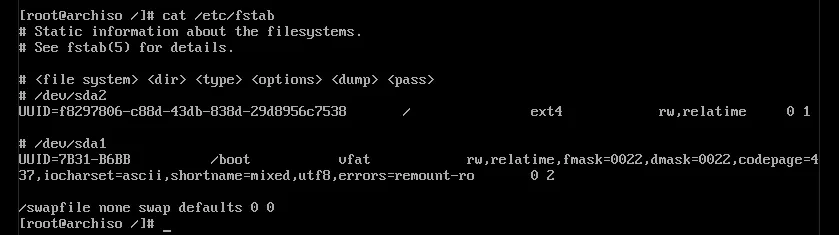
Finally, use the cat command to verify the changes you’ve made to the fstab file.
cat /etc/fstab
Step 10: Configure Localization
In this section, we’ll be setting up your PC’s timezone and the language/localization for it.
Set Timezone
First, set a timezone by using a symlink.
ln -sf /usr/share/zoneinfo/**your region**/**your country** /etc/localtime
To list all the available zones or countries, press Tab on your keyboard for that specific option. For example, if you want to find out the list of available regions, you would type ln -sf /usr/share/zoneinfo/ and then press Tab on your keyboard.
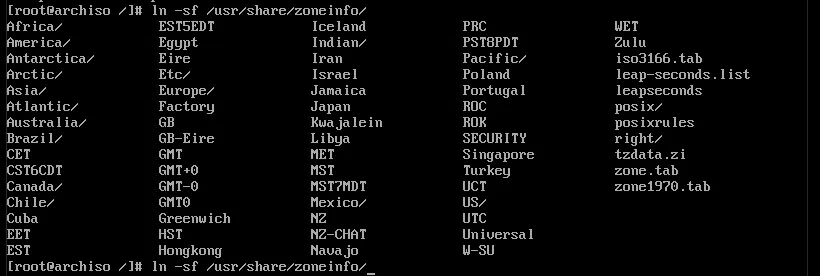
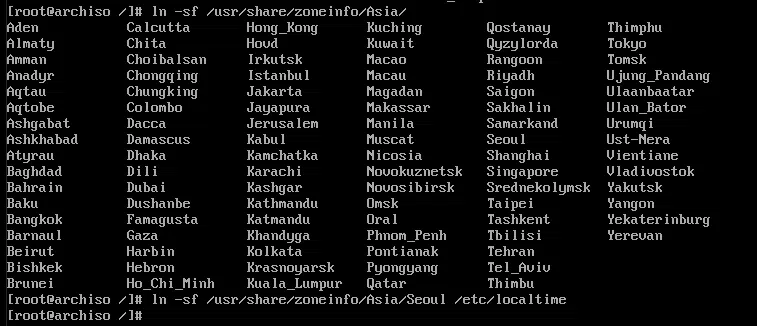
However, it’s important to note that this is all you need to have for ln’s first argument if your zone doesn’t end in a forward slash (/). For example, if your region is Singapore, then ln -sf /usr/share/zoneinfo/Singapore /etc/localtime is all you need.
The same can be done for your specific country once you have chosen your region:
Then, you can now sync the hardware clock and system clock’s times.
hwclock --systohc
Set Locale
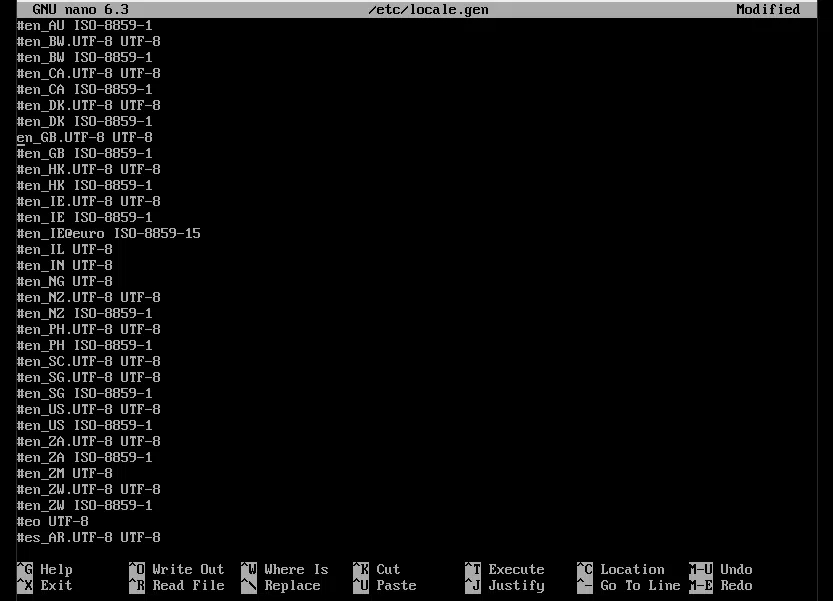
To set the localization (language) you want, uncomment required locales and then generate locales. It’s better to choose the UTF-8 version of the locale than the ISO version.
First, start editing the file itself.
nano /etc/locale.gen
Then, we can generate the locales based on our changes.
locale-gen
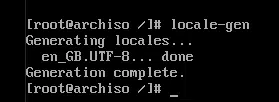
After that, add your chosen locale to /etc/locale.conf. All you have to do is append LANG=**your locale here** to the file. In this example, we’re appending LANG=en_GB.UTF-8 since we uncommented the English locale for Great Britain.
nano /etc/locale.conf
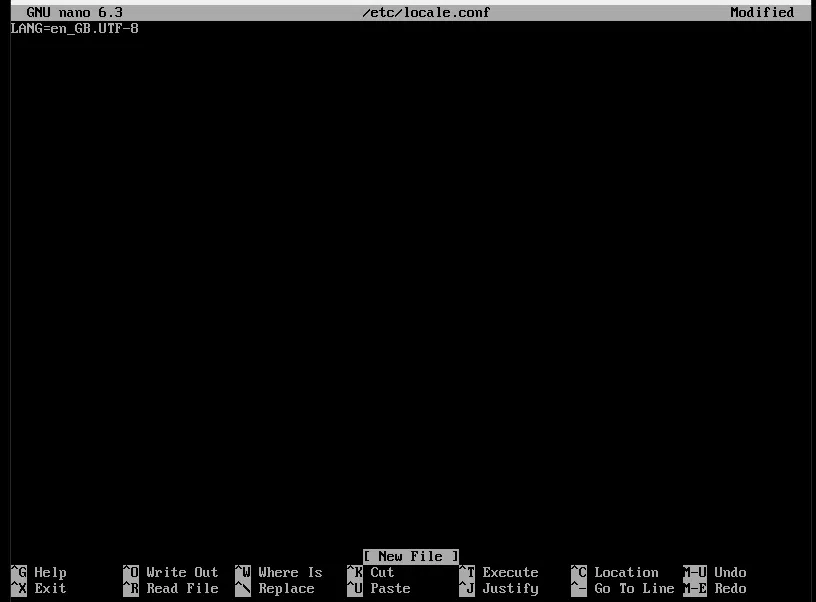
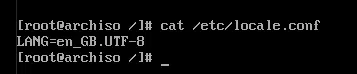
Again, you may verify you have successfully written to the file using the cat command.
cat /etc/locale.conf
Step 11: Set Up Host Settings
So for this step, we’ll be going through setting a name for your computer as well as configuring the host’s file.
First, set your computer’s hostname with the following command.
echo "myhostname" >> /etc/hostname
As usual, you may verify if your PC’s name was successfully written with the cat command.
cat /etc/hostname
Then, you can edit the host’s file.
nano /etc/hosts

---------------------------------
127.0.0.1    localhost
::1     localhost
127.0.1.1    myhostname.localdomain    myhostname
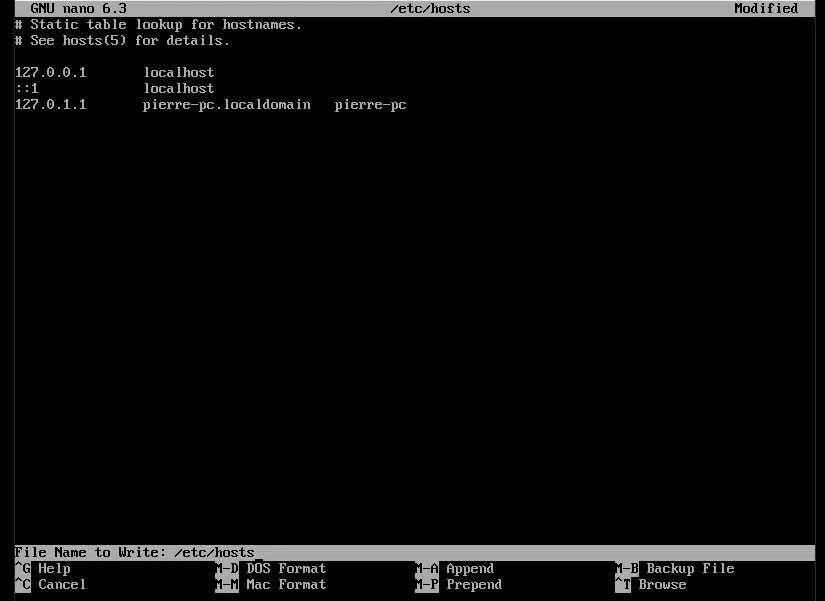
Keep in mind that the values are tab-separated here, though you may also use a space to separate them. It’s just that using tab separation looks neater.
Of course, myhostname just refers to whatever you want your PC’s name to be. Change it accordingly.
Step 12: Install CPU Microcode
So, for this step, your CPUs microcode is going to be installed. This part is important because we will need it when we install the bootloader in Step 14. Of course, not everyone has the same CPU brand on their computer. The two main manufacturers of CPUs in the market are Intel and AMD. As such, you’ll need to make sure you know what brand of CPU you have before proceeding because you’ll have to install a different package depending on it.
It’s quite simple, really. If you have an Intel CPU, you’ll need to install the intel-ucode package. For those rocking an AMD chip, you’ll need the amd-ucode package. However, if you are just looking to test Arch Linux and you’re just installing it into a virtual machine, you may skip this step.
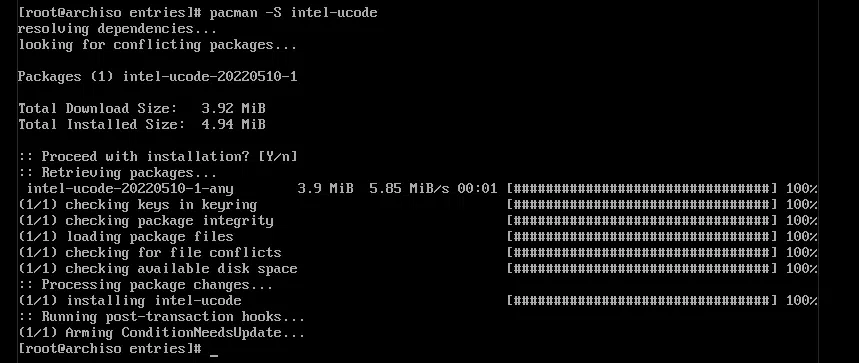
To install it, we’ll need to use pacman, short for the package manager. You can do it by using the pacman command with the -S option followed by all the packages you want. For this example, I’ll be installing the microcode for an Intel CPU. Of course, change it accordingly.
pacman -S intel-ucode
You’ll most likely get prompted to confirm your installation after you hit Enter. Just type y and then hit Enter, or since the default is already Y as highlighted by its uppercasing, you may simply hit Enter.
Step 13: Install and Enable NetworkManager
For this step, we’ll be installing NetworkManager. It’s an indispensable service because it allows you to easily connect to and configure networks that you connect to, whether wired or wirelessly. It’s also a pretty common package that’s required by a lot of DEs or network applications for them to function properly.
Like before, we’ll use pacman to install the package like so:
pacman -S networkmanager
Of course, approve the installation when prompted just like before.
Then, once it’s been installed, we’ll need to enable the service so that it runs in the background. We can do that using the systemctl command. Here’s what the full command looks like:
systemctl enable NetworkManager

Step 14: Install and Configure systemd-boot
In this step, we’ll be installing a bootloader for your PC. The bootloader allows you to choose what specific Linux kernel, or OS for that matter, you want to boot into when you start up your PC. The more typical bootloader that most people install would likely be the Grub bootloader, but I personally prefer to use systemd-boot because it’s far more minimal and doesn’t come with bloatware which mimics Arch Linux’s philosophy. Not to mention, it’s also far easier to understand and less troublesome to set up.
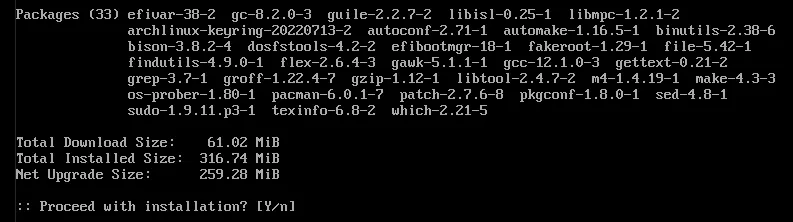
First, we’ll have to install more packages for systemd-boot and other needs. You can do it by using the pacman command with the -S option followed by all the packages you want like so:
pacman -S efibootmgr base-devel os-prober mtools dosfstools
You will most likely get prompted to choose which packages you’d like to install when downloading the base-devel package. You’ll want to install all of them, so just hit Enter on your keyboard since the default option is all.

Of course, when prompted, enter Y or just hit Enter on your keyboard to continue.
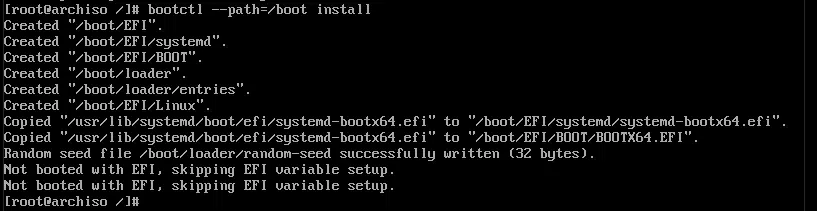
After those packages have been installed, install systemd-boot
bootctl --path=/boot install
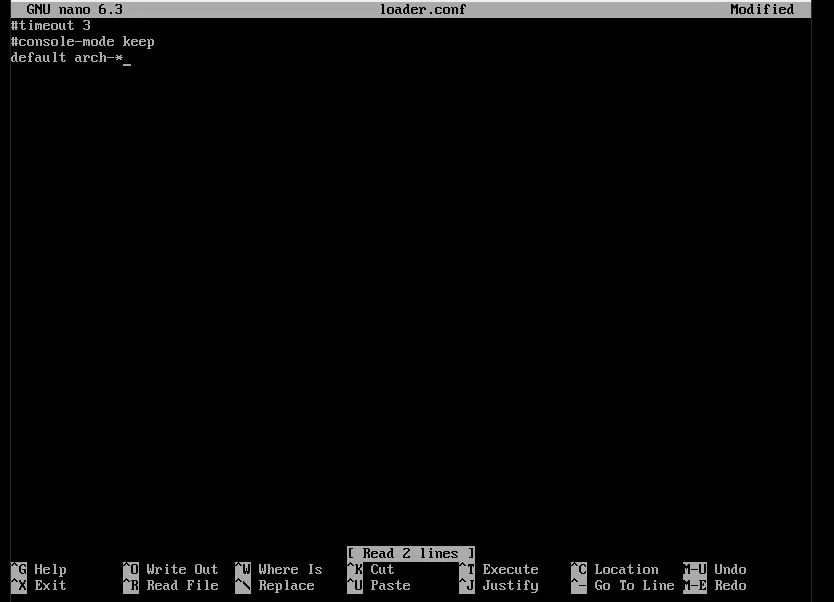
Then, it’s time to configure the bootloader’s options on boot – loader.conf.
cd /boot/loader
nano loader.conf
The settings are to be put inside loader.conf:
#timeout 3

#console-mode keep

default arch-*
Now, we should make an entry for our Arch Linux install that loader.conf can read. This file will contain all the locations for all the necessary files for Arch Linux to boot up successfully.
cd entries
nano arch.conf
So, basically, your current directory should be /boot/loader/entries since we continued from the previous step. You can print your current directory with the pwd command.
The code to be put inside arch.conf:
title    Arch Linux
linux    /vmlinuz-linux

initrd   /intel-ucode.img
initrd   /initramfs-linux.img
options  root=/dev/sda2 rw
If you’re installing it into a virtual machine, do not include the line with your CPU’s microcode.
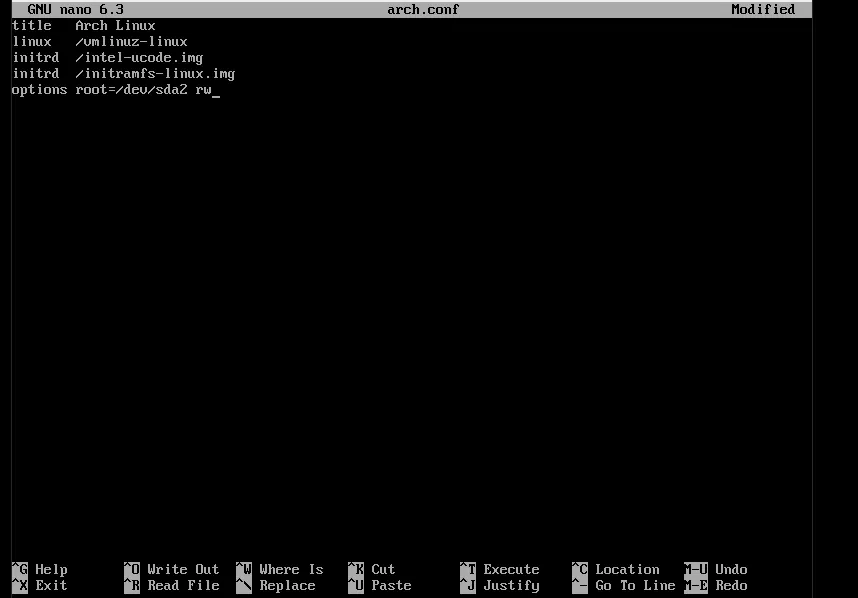
Like in other .conf files, the values have been tab-separated.
Step 15: Set Up New User
Finally, we’re at the last step! This is the part where we set up a new user with its own username and password. So far, we’ve been issuing all the commands as root, which means we have the highest privileges and can pretty much do anything we want. That’s generally an unsafe thing to do in terms of security and if you plan to use this system as your daily driver. Who knows, you may accidentally run a command that bricks your PC!
Of course, you can set up multiple users, but we’ll detail how to set up just one for yourself here:
First, set the root password with the passwd command.
passwd
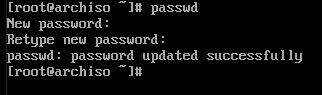
Do note that your password or whatever you type when it prompts you for a password will not show up. This is perfectly normal and is done to keep your password private as a form of security. Rest assured that your password is still actually getting registered into the terminal.
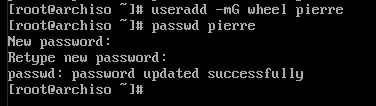
Next, add a new user to the wheel group and set a password.
useradd -mG wheel username

passwd username
Here, username is whatever you want your username to be. Then, we’ll also have to set a password for this user. In this example, I just put pierre as the username.
Then, we’ll need to set up sudo privileges for the user. This is done through the sudoers file and can be accessed with the following command:
EDITOR=nano visudo
Basically, you’ll want to go all the way down the file until you see the User privilege specification section. Here, you need to uncomment the appropriate user privilege specification you want and then save the file.
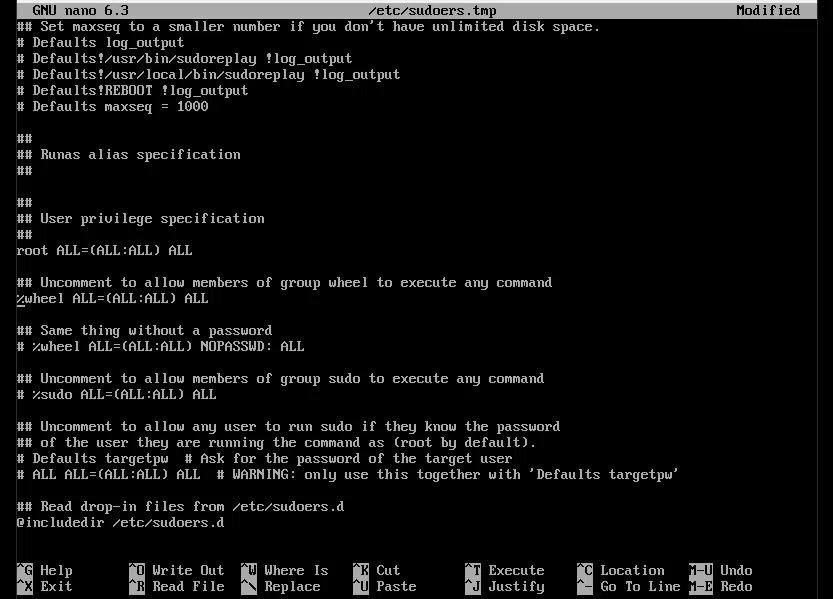
For Uncomment to allow members of group wheel to execute any command, it means that you’ll be able to use the sudo command to run that specific command with root privileges without being logged into the root user itself. But, it will prompt you for the password before it lets you run the command with root privileges.
Then, for Same thing without a password, it’s pretty self-explanatory. You’ll be able to run commands with sudo but it won’t prompt you for a password.
As for the other options, they’re not relevant to this guide.
Step 16: Finalize Installation
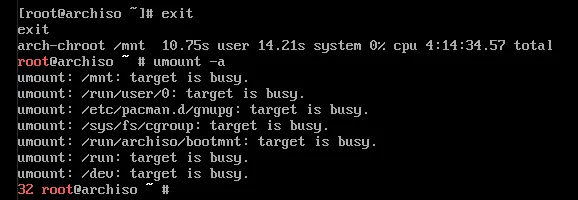
Here, we’re just going to exit chroot, unmount the partitions, and reboot into the new Arch install.
exit

umount -a

reboot
After running umount -a, you will probably get some messages about your drives and partitions currently being busy and thus cannot be unmounted. This is ok and totally expected — the command is just a precaution.
You can just enter either reboot or shutdown now to reboot the PC or shut it down. Of course, you’ll need to make sure you choose the new install in your BIOS upon bootup so that it doesn’t boot into the live ISO again.
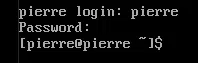
If you manage to reboot into the new Arch Linux install, congratulations! Pat yourself on the back because you just installed an OS using the terminal! You’ll notice that it’s pretty barebones and only has the terminal — that’s totally normal.
Post Installation
This section details the possible customizations and modifications to make Arch Linux suitable as a desktop OS for daily use after its installation. All the modifications listed here are purely optional and based on preference. In this case, the guides here are based on my preferences. As such, you may briefly skim through all the modifications and apply the changes that you feel will work best for you.
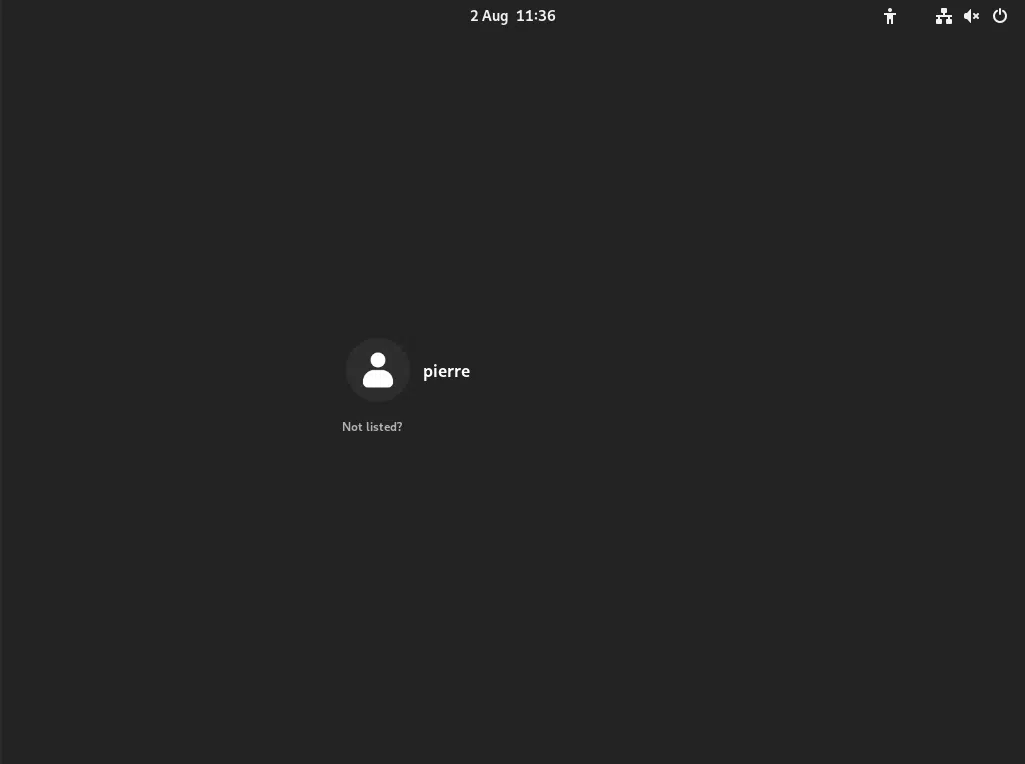
Upon boot up into the new install, log in to your newly created user account.
Base Packages
My preferred DE is Gnome due to its minimalism and simplicity. You can install all the packages bundled with Gnome just by installing the gnome package group, but I don’t use a lot of the things included in that group. Instead, I just install the packages I need individually. So, this is how I perform my minimal Gnome install.
| Services and Utilities | Use Case |
| openssh | SSH server to remotely access my PC |
| git | Support for downloading files from Git-based repositories |
| nvidia | General Nvidia graphics driver packages |
| nvidia-utils | |
| nvidia-dkms (if installing custom kernel) | |
| nvidia-settings | |
| mesa | General Intel or AMD graphics driver packages |
| lib32-mesa | |
| vulkan-radeon | |
| lib32-vulkan-radeon | |
| libva-mesa-driver | |
| lib32-libva-mesa-driver | |
| xf86-video-amdgpu | |
| gnome-shell | Gnome Desktop Environment package essentials |
| gnome-tweaks | |
| gnome-shell-extensions | |
| gnome-terminal | |
| gnome-control-center | |
| gdm | |
| xdg-user-dirs-gtk | Creates directories in your filesystem similar to Windows |
Of course, the Nvidia drivers were installed since I use an Nvidia graphics card. You will need to install the packages listed for AMD graphics cards as listed above if you have one on your computer.
This is what your install command should look like if you have an Nvidia GPU:
sudo pacman -S openssh git gnome-shell gnome-tweaks

gnome-shell-extensions gnome-terminal gnome-control-center gdm

xdg-user-dirs-gtk nvidia nvidia-utils nvidia-settings nvidia-dkms
| Applications | Use Case |
| gthumb | Simplistic image viewer |
| gimp | Image editor |
| mpv | Feature-packed video player |
| qbittorrent | Torrenting client |
| firefox | Linux community’s preferred web browser |
| discord | Instant messaging social platform |
| vscodium-bin (AUR package) | Microsoft Visual Studio code without the telemetry |
| libreoffice-fresh | Locally installed office suite |
| baobab | A graphical directory tree analyser. Similar to WinDirStat on Windows. |
| nautilus | File manager |
If you’d like to install these packages, your pacman command should look something like this:
sudo pacman -S gthumb gimp mpv qbittorrent firefox discord vscodium-bin libreoffice-fresh baobab nautilus
Gnome Desktop Environment
Once you’ve installed the necessary Gnome packages, run the following commands to set up user directories and the gnome display manager respectively.
xdg-user-dirs-update

sudo systemctl enable --now gdm
The second command should refresh your display, and you should be able to see the Gnome desktop interface.
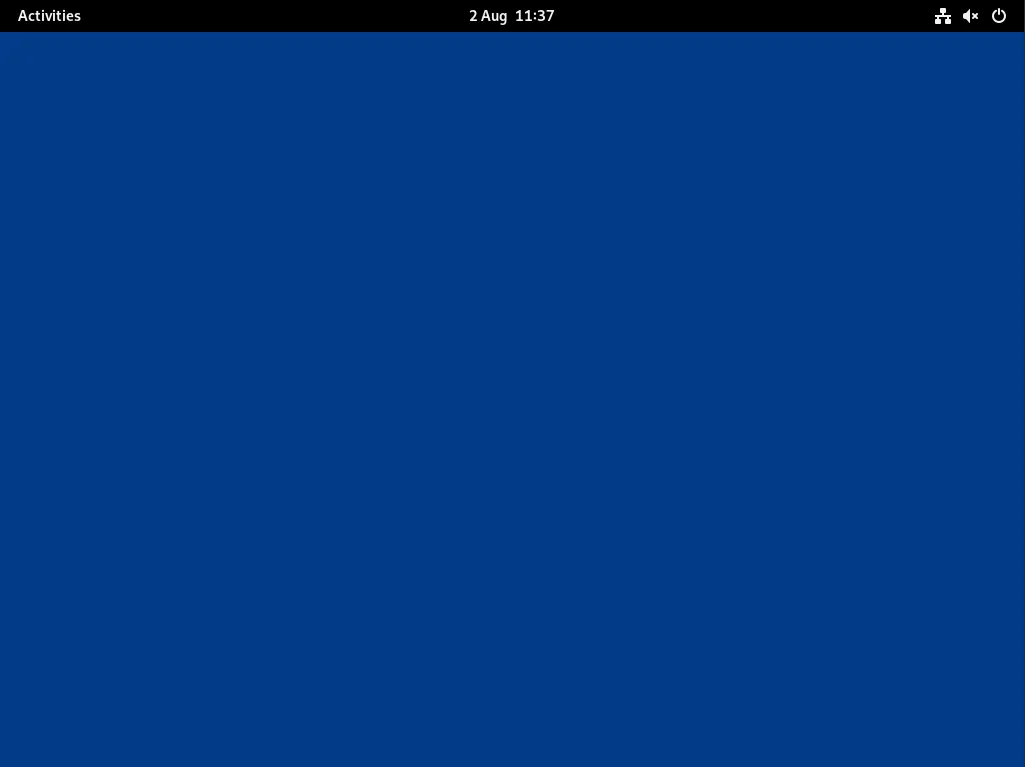
Now that we have a desktop, I suggest opening this article on that PC so that you can take advantage of the links and copy the commands here. If this is your first time using the Gnome DE, here’s a link to a handy cheatsheet that will get you up and running on how to use Gnome.
Opening the Terminal
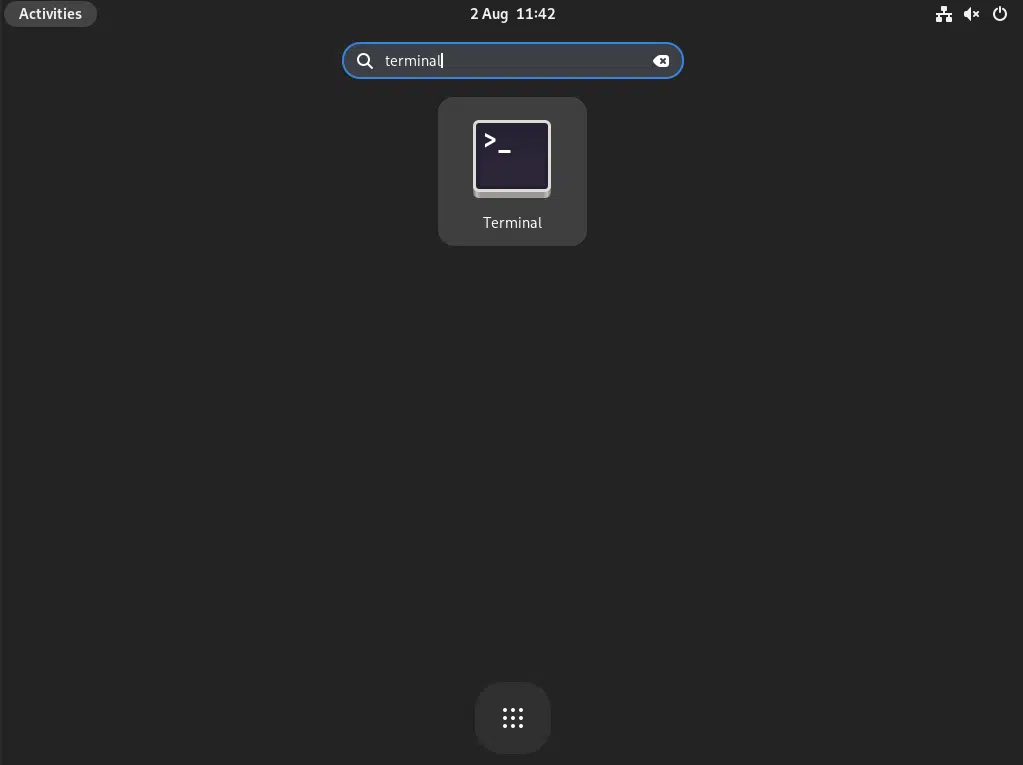
We’ll be running terminal commands again, so we’ll need to open up our Gnome Terminal app. Here’s how:
- First, press the Windows/Super key on your keyboard.
- Then, in the newly opened app search menu, type Terminal.
- Finally, click on the Terminal app or just hit Enter on your keyboard if it’s already highlighted.
Paru
Next, we need to get an AUR helper to install modified Gnome apps and gain easy access to the AUR.
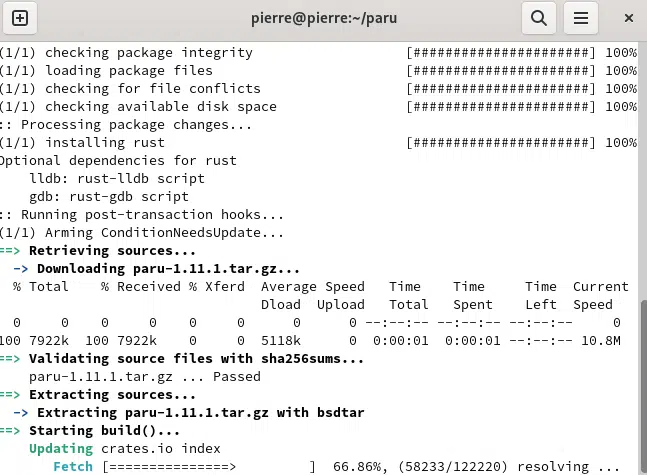
I choose paru as my AUR helper, and you can download it from the AUR by running:
git clone https://aur.archlinux.org/paru.git
Then, cd into the new paru directory and run makepkg.
cd paru

makepkg -si
It will likely ask you to install the rust package since paru was made with the Rust programming language. Just approve all the prompts and let it do its thing.
The next sections detail the Quality of Life changes to Paru that I always like to do.
Add color to Pacman/Paru
For a full list of Paru’s features and configuration, visit the Github repo.
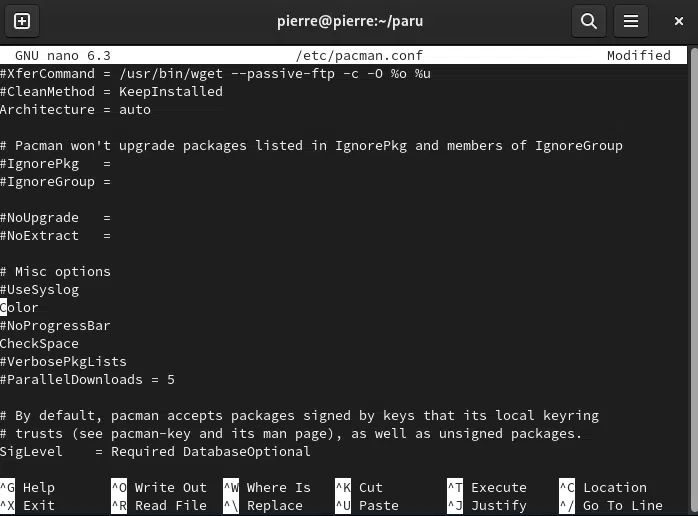
Paru can get color in its output when Pacman has the color option enabled. Here’s how to do just that.
Simply uncomment the color option under the Misc options section in the /etc/pacman.conf file.
sudo nano /etc/pacman.conf
Bottom Up Listings
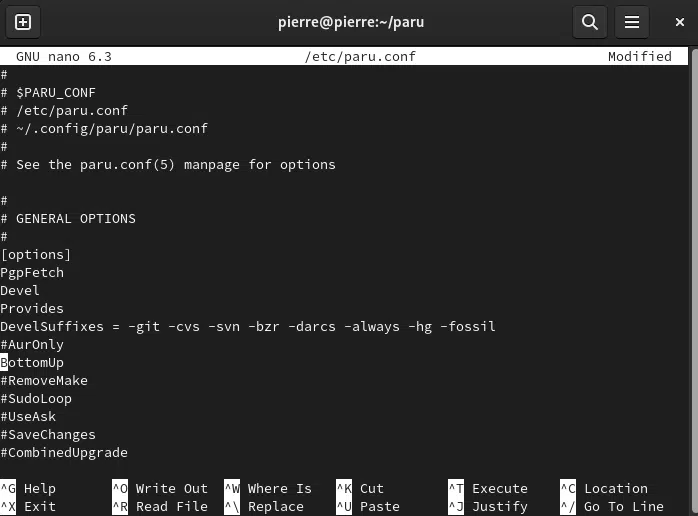
By default, Paru lists packages in order of relevance with numbers in ascending order. Usually, the first few packages are what you actually want, but since the order is in this way, they will inevitably get pushed all the way up the terminal, meaning you won’t be able to see them at a glance. In other words, your cursor is always at the bottom of the list, but the package you most likely want is at the top. This option reverses the way it’s presented, meaning the most relevant package is closest to your cursor in the terminal.
Simply uncomment the BottomUp setting under the options section in the /etc/paru.conf file.
sudo nano /etc/pacman.conf
Enable the Multilib Repository
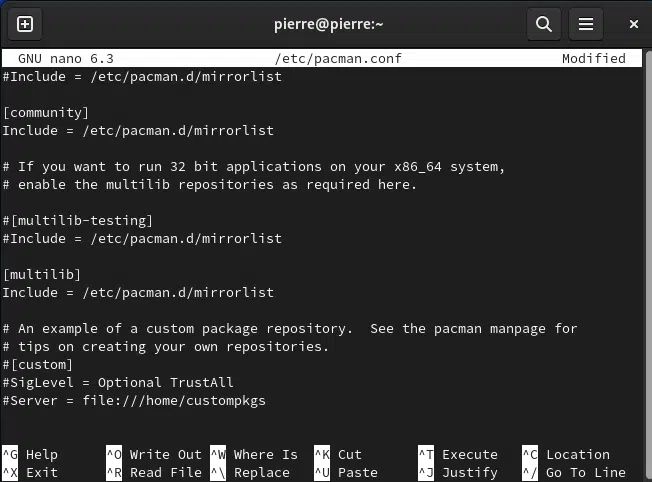
As you already know, there are many packages available through the pacman package manager. However, these packages are separated into their own repositories. A plain install of Arch Linux has most of them enabled by default, but not all of them. One such repository is the multilib repository which includes many great packages. Here’s how to enable it:
- First, open up your terminal.
- Then, edit /etc/pacman.conf by issuing the following command:
sudo nano /etc/pacman.conf
- In the file, make sure to uncomment out the [multilib] section and its contents.
- Next, save the file
- Finally, run paru -Sy in your terminal to download the new repository!
Startup Services
OpenSSH
This is one of the first things I do since it will allow me to remotely access the PC, which is a huge boon, especially when graphical stuff goes wrong.
To have the SSH daemon start whenever your PC boots up, this is the command you’ll need to enter into the terminal:
sudo systemctl enable --now sshd
Language Support
You might regularly converse in two or more languages while you’re on the computer, so it’s a good idea to install proper support for another language. This section will guide you on how to install and set up the appropriate packages to get language support for almost any language.
In this case, I’ll demonstrate how to do so in Korean.
Characters
The Korean language has different characters as opposed to the Latin alphabet that English uses, which is the one we currently have installed. So, if your desired language needs different characters, you’ll need to follow along with this step.
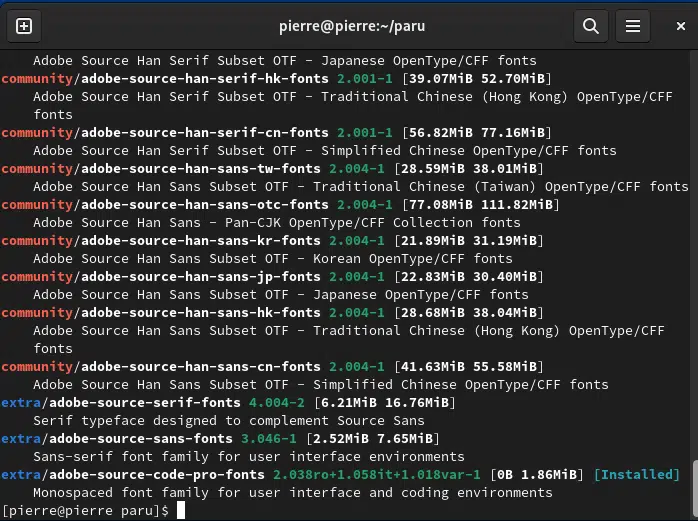
Generally, adobe-source-* has all the characters and fonts you’ll need for Asian languages. So, you can actually search for the available fonts using paru like this:
paru -Ss adobe-source-
It will return a list of all the available packages that contain our search term, adobe-source-
If your desired language isn’t on this list, a quick Google search or perusal on the Arch Wiki is sure to net you some relevant results on what package to install.
Having said that, we’ll need to install adobe-source-han-sans-kr-fonts for the Hangul characters. So, this is the command I’ll use:
paru -S adobe-source-han-sans-kr-fonts
Change System Language
If you’d like to change the entire system’s language to Korean, you can do the following:
- First, uncomment the ko_KR.UTF-8 localisation in /etc/locale.gen
- Then, add the locale to /etc/locale.conf, just like how it was done in the manual install of Arch in Step 10
- Finally, run the following command in the terminal:
locale-gen
Of course, you’ll need to uncomment the appropriate localization for your chosen language instead.
Language Input (Keyboard Mapping)
For the Hangul keyboard, ibus can be used, which allows you to easily switch between your typical ANSI keyboard layout and a Hangul mapped keyboard. Ibus is available for most Asian languages as well.
Here’s how to set it up on your system:
- First, install ibus-hangul.
- Then, reboot the system.
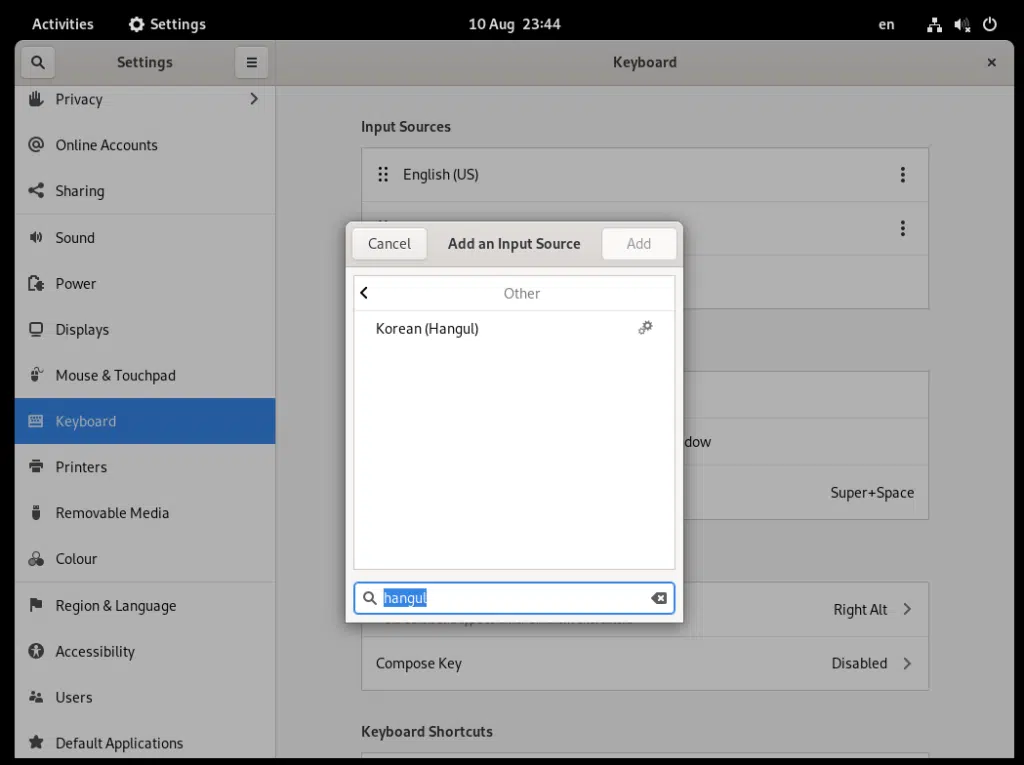
- Once you’re back into the desktop, launch Gnome Settings.
- After that, select Keyboard in the left sidebar.
- Then, add an input source by clicking on the + button.
- Finally, search for ‘hangul’ or your desired language and keyboard mapping layout and add it.
- You can configure the keymaps to your taste by clicking on the new language button on the right side of the Gnome top bar
If ibus isn’t available for your chosen language, you can also change the keymap of your keyboard permanently with the following method:
- First, we’ll need to list out all the available keymaps to see if your desired keymaps are available. You can do so with the following command:
localectl list-keymaps
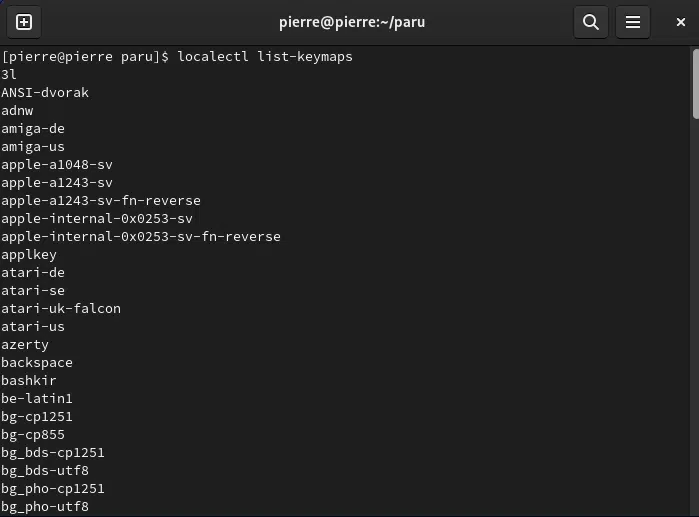
- Then, if your keymap is in the list, you can switch to it with the following command:
sudo localectl set-keymap --no-convert keymap
Auto Login on Startup
This one is pretty self-explanatory. Maybe you’ve set your Windows PC to be like this for the sake of convenience. It goes without saying that we only recommend this if you’re absolutely sure about the security of your PC since anyone can start using it without logging in.
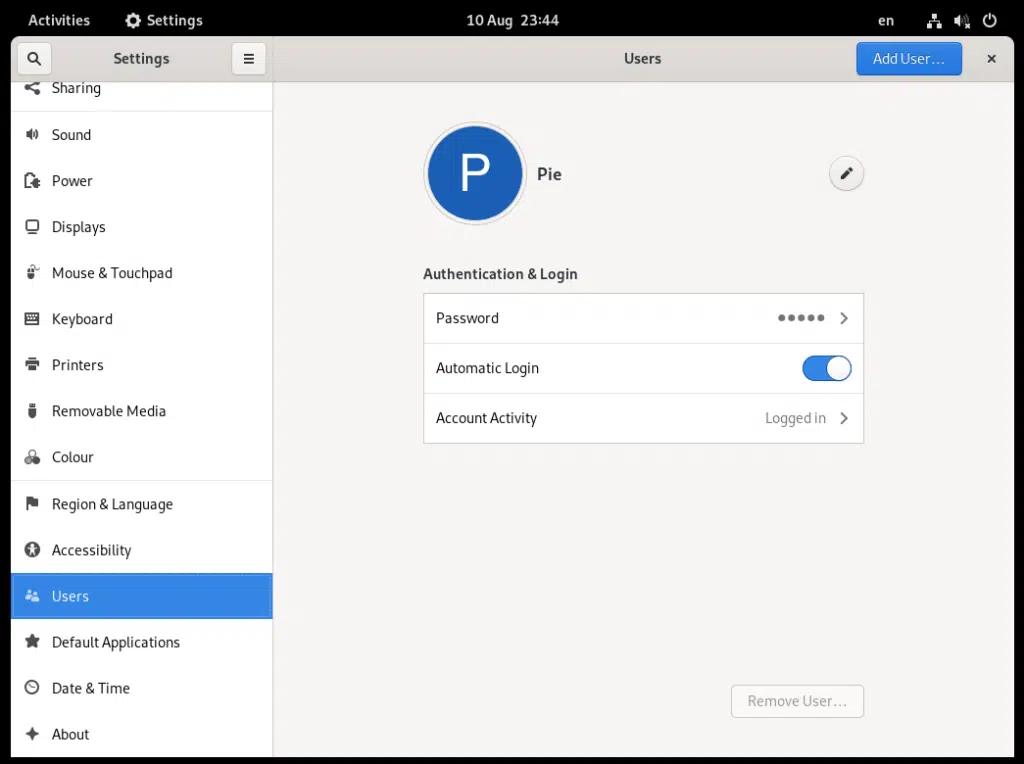
Here’s how to do it on Arch Linux with Gnome:
- Start by opening up Gnome settings.
- Then, select the Users tab in the left sidebar.
- Finally, under Authentication & Login on the main page, toggle Automatic Login.
Theming
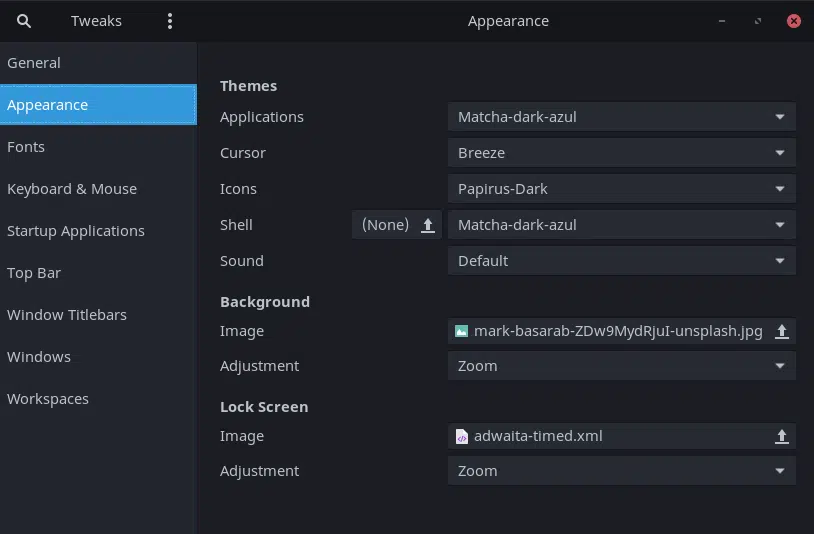
You might have thought that the Gnome desktop environment is rather drab and bland. Luckily, it’s also pretty customisable. There are a multitude of different add-ons and modifications available on the Internet for you to try out, all for free. Having said that, the following steps will guide you on how to install the custom themes, fonts, cursors and extensions I personally use on my Arch Linux system.
Theme, Fonts, and Cursor
Required packages:
- matcha-gtk-theme
- papirus-icon-theme
- xcursor-breeze
- gnome-font-viewer (or any font viewer/installer for that matter)
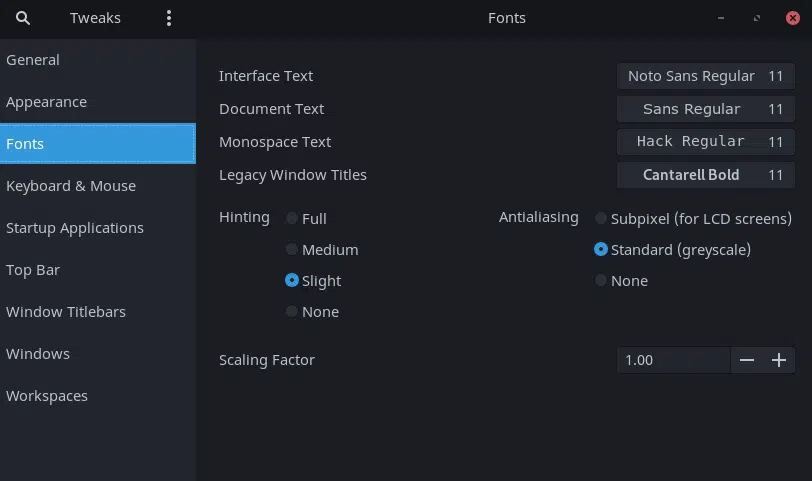
Required fonts:
- Noto Sans Family
- Sans Family
- ttf-opensans
- Hack Family
- ttf-hack
Here’s a quick command for the ones that can be downloaded using paru:
paru -S matcha-gtk-theme papirus-icon-theme xcursor-breeze gnome-font-viewer ttf-opensans ttf-hack
It should be noted that I don’t recommend the noto-fonts Arch package because it’s bloated and we only require these specific fonts.
Then, you can open up the Gnome Tweaks app and replicate these settings.
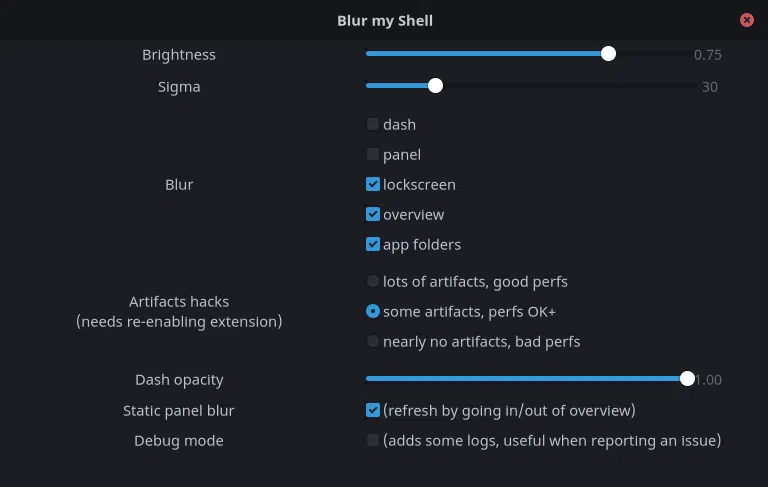
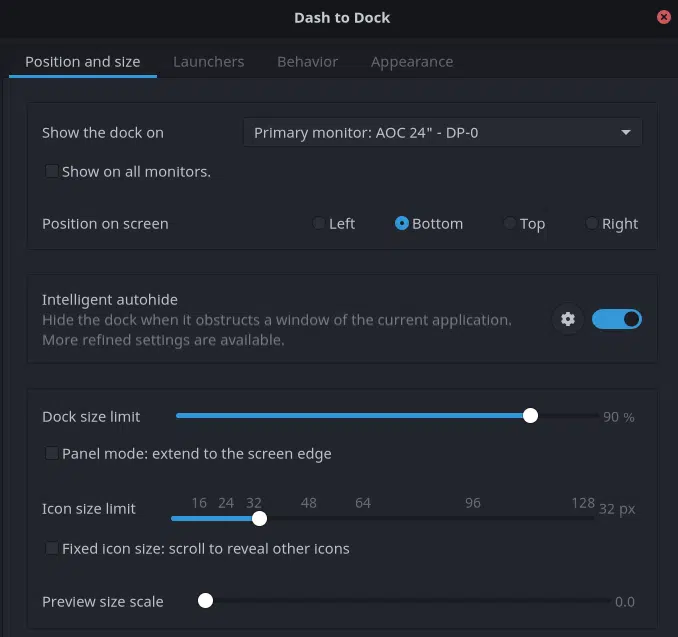
Gnome Extensions
This list of extensions are my favorite to enable and configure on my system. Their uses range from purely visual changes to functional improvements to the system.
| Extension | Use Case |
| Application Volume Mixer | Gives you fine control for per-application volume control, similar to Windows’ Volume Mixer. |
| Blur my Shell | Blurs the Gnome shell for a modern look.
|
| Just Perfection | Similar to Blur my Shell but with different options. |
| Transparent Top Bar | Another visual tweak that modernises the desktop. |
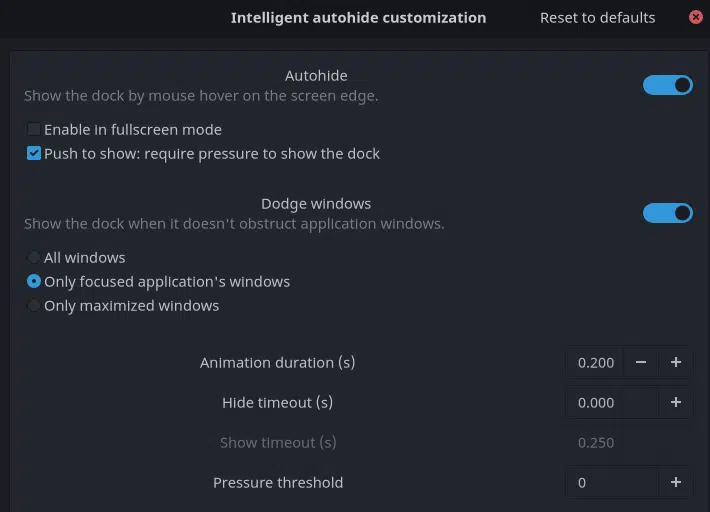
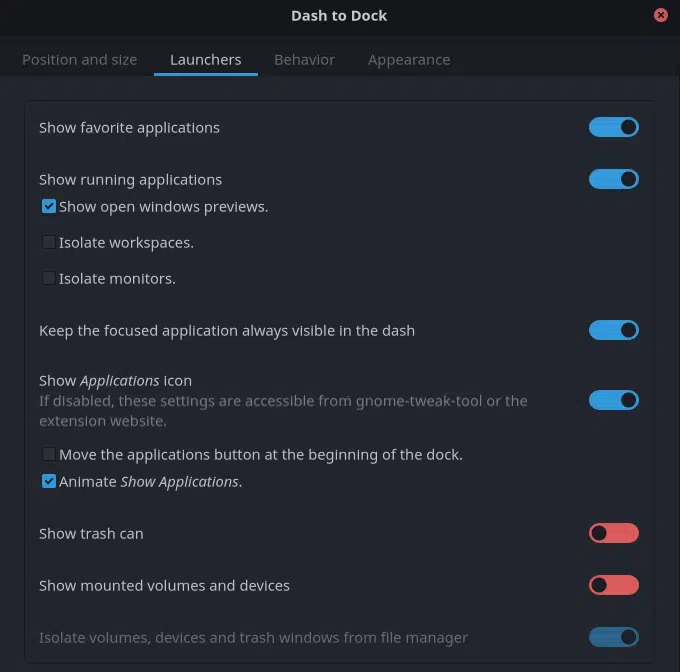
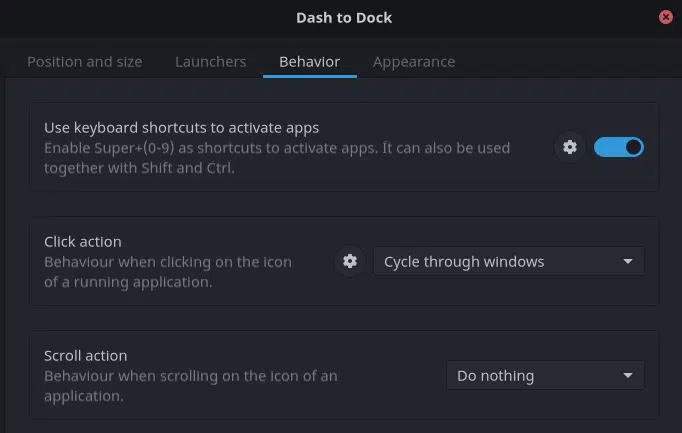
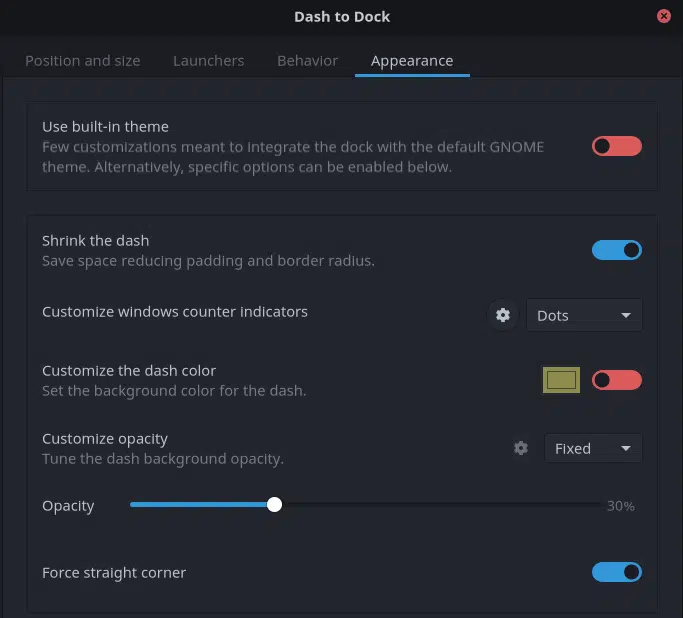
| Dash to Dock | Adds a dock similar to macOS
|
Powerlevel10k and ZSH
Who doesn’t like a themed shell? I highly recommend customizing your terminal since it not only adds a pop of colour to your typical black and white CLI, but also adds lots of great functionality. ZSH adds some much appreciated QoL changes for faster terminal navigation and ease of use. I highly recommend taking a look at the official install guide on the Powerlevel10k Github repo, but I will also be providing my own speedy version of the install that suits my needs.
First, install the required packages:
- zsh
- zsh-completions
- zsh-autosuggestions
- zsh-theme-powerlevel10k-git
- ttf-meslo-nerd-font-powerlevel10k
You can easily do it by issuing this command:
paru -S zsh zsh-completions zsh-autosuggestions ttf-meslo-nerd-font-powerlevel10k
For powerlevel10k itself, you’ll need to install it manually with these two commands:
git clone --depth=1 https://github.com/romkatv/powerlevel10k.git ~/powerlevel10k

echo 'source ~/powerlevel10k/powerlevel10k.zsh-theme' >> ~/.zshrc
Then, you have to change the default shell from bash to zsh
First, issue the change shell command:
chsh $USER
After that, in the input prompt, enter the following:
/bin/zsh
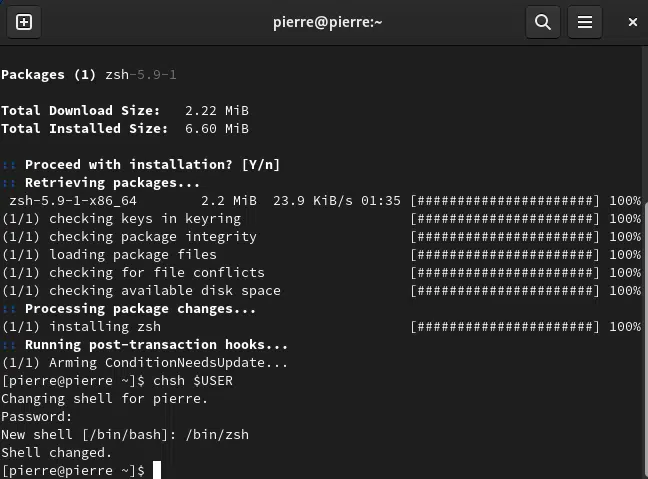
Next, log out and log back into your account.
Finally, open your terminal and run through the setup process. If there is no powerlevel10k prompt that starts by default, run the following command:
exec zsh
If that still doesn’t work, you may run this command:
p10k configure
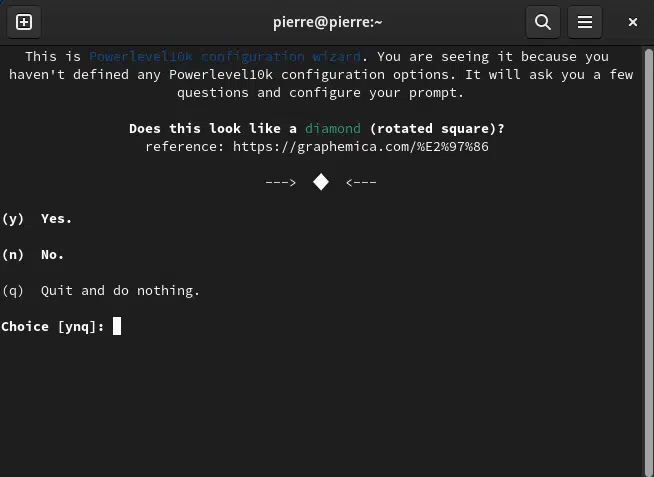
All you have to do now is run through the guided installer!
GSConnect
GSConnect is the Gnome implementation of KDEConnect, allowing incredible integration between your Android phone and your PC. Handy features such as sharing clipboards, easily sending files between devices and mounting your phone into the filesystem is possible through GSConnect, among others. If you were lamenting the absence of AirDrop because you don’t have a Mac or an iOS device, this is essentially the Android version of that!
Simply enable the GSConnect extension through its webpage. Of course, the prerequisite is that you’ve installed the Gnome Extensions package.
Additionally, you can install the python-nautilus package to add the “Send to Mobile Device” function in the context menu when right-clicking items in the Nautilus file manager.
Linux Zen Kernel
When I first installed Arch Linux on my PC, I was getting random shutdowns. I initially attributed this to the kernel and as such, I tried out the Linux Zen kernel which seemed to solve the issue, though it may have been a badly seated RAM stick. Nonetheless, the Zen kernel is a good addition since it features some patches that seem to make the system feel more responsive when multitasking.
Furthermore, it also implements Esync for improved game performance. If you’re worried about whether certain packages, like the Nvidia drivers, may conflict with a custom kernel, I’ve had no issues with the automatic DKMS manager (nvidia-dkms) handling all of it. Overall, I recommend installing the Linux Zen kernel.
Start by installing the Zen kernel and its headers.
paru -S linux-zen linux-zen-headers
Then, add a new bootloader entry at /boot/loader/entries/filename.conf. Here, I’ve called it zen.conf
sudo nano zen.conf
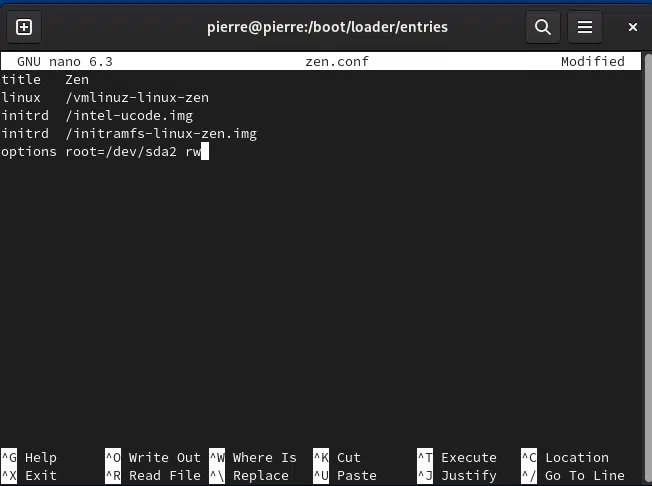
In fact, we’re basically just repeating the latter part of Step 15 but pointing towards the new kernel in another .conf file. It goes without saying that you change the third line’s .img file to whatever your CPU’s appropriate microcode is.
Next, reboot your system. However, while it’s booting up, be sure to hold down the Space key on your keyboard to bring up systemd-boot’s boot menu. Here, you can select the Zen entry that was just created, and it should be the default moving forward
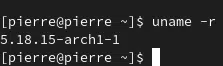
Once you’ve booted into Arch Linux, you can verify if you’re running the new kernel with:
uname -r
Conclusion
And that’s a wrap for how to install Arch Linux from scratch! If you read through everything, it must have been one long read! It’s because we went through both methods of installing Arch Linux, the traditional manual way and the new Archinstall guided way, as well as what my favorite modifications and apps are for Arch Linux. These changes are so that Arch Linux becomes a great experience as a desktop OS, so it’s definitely worth investing the time.
With that said, have fun with your new install of your Arch Linux OS!
Be sure to sound off in the comments below if you have:
- Any questions for us.
- Any errors in the article.
- Suggestions for how to customize Arch Linux.
Feel free to share this post with someone you know who wants to install Arch Linux on their setup.