

Want to learn how to add, install and use Bootstrap with Visual Studio Code?
Do you want to create beautiful and responsive web pages without writing too much code? Do you want to use a powerful code editor that supports many languages and extensions? If you answered yes to both questions, then this guide is for you.

Bootstrap is a popular framework for creating responsive web pages. Visual Studio Code is a powerful code editor that supports many languages and extensions.
In this guide, you will learn how to use Bootstrap with Visual Studio Code in three easy steps. Bootstrap is a popular framework for creating responsive web pages. Visual Studio Code is a powerful code editor that supports many languages and extensions. By using them together, you can create stunning web pages faster and easier.
Ready to get started? Let’s go!
Table of Contents
How to Add, Install and Use Bootstrap with Visual Studio Code?
This guide will show how to use Bootstrap with Visual Studio Code in three steps:
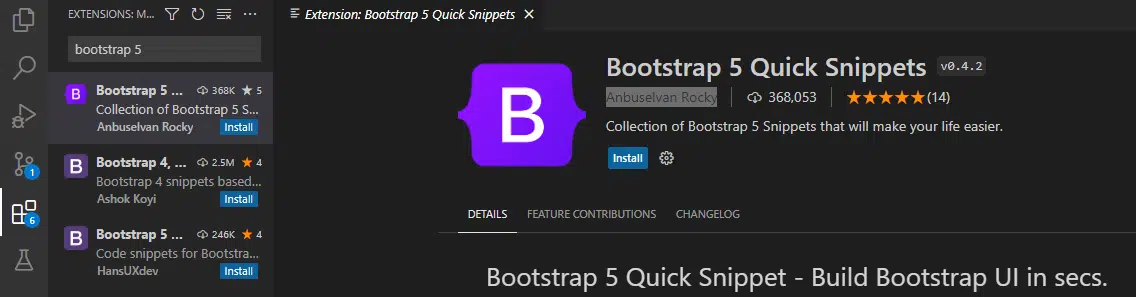
Step 1: Install the Bootstrap 5 Extension
The Bootstrap 5 extension is a useful tool that helps you write Bootstrap code faster and easier. It provides code snippets, autocomplete, documentation and live preview for Bootstrap components. To install the extension, follow these steps:
- Open Visual Studio Code and click on the Extensions icon on the left sidebar.
- Search for “Bootstrap 5” and select the one by Anbuselvan Rocky.
- Click on the Install button and wait for the installation to finish.
Step 2: Add Bootstrap
To add Bootstrap to HTML, you can use one of the following three methods.
Method 1: CDN Links
The Bootstrap CDN link is a simple way to include Bootstrap in your web page without downloading any files. It is a URL that points to the latest version of Bootstrap hosted on a server. You can find the latest CDN links on the official website.
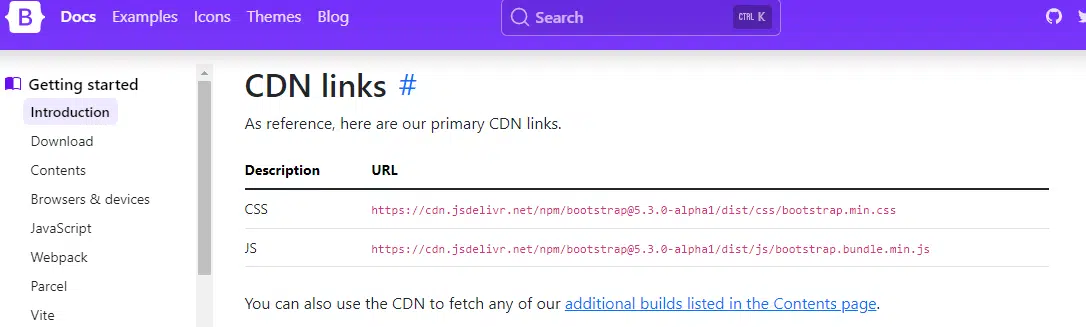
To add the Bootstrap CDN link, follow these steps:
- Create a new HTML file and name it whatever you want.
- In the head section of your HTML file, add this line:
<link rel="stylesheet" href="https://stackpath.bootstrapcdn.com/bootstrap/5.1.3/css/bootstrap.min.css">
This will link your HTML file to the Bootstrap CSS file. This can save you time and disk space, and also benefit from faster loading times and caching. However, using a CDN also means that you depend on an external service that may not be available or reliable at all times.
You also have less control over the version and customization of Bootstrap to use the Bootstrap components in your HTML, you need to add some classes and attributes to your HTML elements.
Method 2: Downloading the Bootstrap Files Locally
Instead of using CDN, you can also download the files locally to your project folder from:
https://getbootstrap.com/docs/5.3/getting-started/download/
Once you download the file, you can include the bootstrap.min.css file in the <head> and bootstrap.min.js in <body>. Even if you are using the downloaded bootstrap file, you have to include jquery.min.js and popper.min.js before loading bootstrap.min.js.
This method can ensure that your website works even if the CDN service is unavailable. It can also give you more control over the files and allow you to customize them if needed. However, it also means that you have to update the files manually whenever there is a new version of Bootstrap. It can also increase your server load and bandwidth usage.
Method 3: Using Package Managers
Another way is that Bootstrap can also be easily pulled into any project using package managers such as ‘npm’, ‘yarn’ etc. Since npm is the most popular package manager used by front-end developers, we are going ahead with the npm command for installing bootstrap. Type the following command in your project folder (assuming you have initialized npm in the project):
npm install bootstrap
This command will download a local copy of bootstrap files inside the ‘node_modules’ folder in your project. You can then include the bootstrap.min.css file the <head> and bootstrap.min.js in <body>. As mentioned previously, you have to include jquery.min.js and popper.min.js before loading bootstrap.min.js.
This method can make it easier to install and update Bootstrap with a single command. It can also help you manage other dependencies and modules for your project. However, it also requires some knowledge and configuration of the package manager you are using. It can also add some complexity and overhead to your project.
Step 3: Use the Bootstrap Classes and Components
The Bootstrap classes and components are the building blocks of your web page. They are predefined styles and elements that you can use to create various layouts and features. To use the Bootstrap classes and components, follow these steps:
In the body section of your HTML file, write your HTML code using the Bootstrap classes and components. You can use the Bootstrap 5 extension to help you with code snippets, autocomplete and documentation.
For example, you can create a simple navigation bar using this code:
<nav class="navbar navbar-expand-lg navbar-dark bg-dark">
<div class="container-fluid">
<a class="navbar-brand" href="#">Bootstrap Guide</a>
<button class="navbar-toggler" type="button" data-bs-toggle="collapse" data-bs-target="#navbarSupportedContent" aria-controls="navbarSupportedContent" aria-expanded="false" aria-label="Toggle navigation">
<span class="navbar-toggler-icon"></span>
</button>
<div class="collapse navbar-collapse" id="navbarSupportedContent">
<ul class="navbar-nav me-auto mb-2 mb-lg-0">
<li class="nav-item">
<a class="nav-link active" aria-current="page" href="#">Home</a>
</li>
<li class="nav-item">
<a class="nav-link" href="#">About</a>
</li>
<li class="nav-item">
<a class="nav-link" href="#">Contact</a>
</li>
</ul>
</div>
</div>
</nav>
To make the navigation bar work, you also need to add this line at the end of your body section:
<script src="https://stackpath.bootstrapcdn.com/bootstrap/5.1.3/js/bootstrap.bundle.min.js"></script>
This will link your HTML file to the Bootstrap JavaScript file.
Step 4: Save and Run Your HTML File
The final step is to save and run your HTML file in a browser to see the result. To do this, follow these steps:
- Save your HTML file by pressing Ctrl+S or clicking on File > Save.
- Open your HTML file in a browser by right-clicking on it and selecting Open with Live Server or Open with Browser Preview (depending on which extension you have installed).
- You should see your web page with Bootstrap styles and features.
Conclusion
You have reached the end of this guide on how to add, install and use Bootstrap with Visual Studio Code. You have learned how to install the Bootstrap 5 extension, add the Bootstrap, use the Bootstrap classes and components, and save and run your HTML file. You have also seen how the Bootstrap 5 extension can help you write Bootstrap code faster and easier.
Now you can create beautiful and responsive web pages using Bootstrap and Visual Studio Code. You can also explore more Bootstrap features and components by visiting the official Bootstrap website or reading the Bootstrap documentation. You can also learn more about Visual Studio Code by visiting the official Visual Studio Code website or reading the Visual Studio Code documentation.
Happy coding!
Feel free to share this post with web developers who need help with Bootstrap! 😊