
Have you ever encountered trouble with your Visual Studio Code not updating or showing the “Update Failed” or “Failed to install update” error?
These problems are common when working with an advanced text editor such as Visual Studio Code. The update usually provides the user with a variety of support from the developer, ranging from bug fixes to new features that will improve the experience of using the application. Most of the time, these issues are easily fixable, and you will be back to working on your application in no time!
In this article, I will explain all the steps you can take to fix the problem of your Visual Studio Code not updating.
Table of Contents
1. Restart the Visual Studio Code Application
Restarting visual studio code is one of the most common ways that users report that they have fixed the problems they were facing with the update. At times, due to caching problems, an application needs to be restarted for the updates to take effect. This is one of the reasons why your Windows computer asks you to restart your system after an update is downloaded so that you can install it.
You can restart your Visual Studio Code by
- Open the command palette or press Ctrl+Shift+P
- Type the following:
> Reload Window
Another way, which is rather traditional, is to close your visual studio code application and restart your computer. Upon restarting your system, follow the following steps:
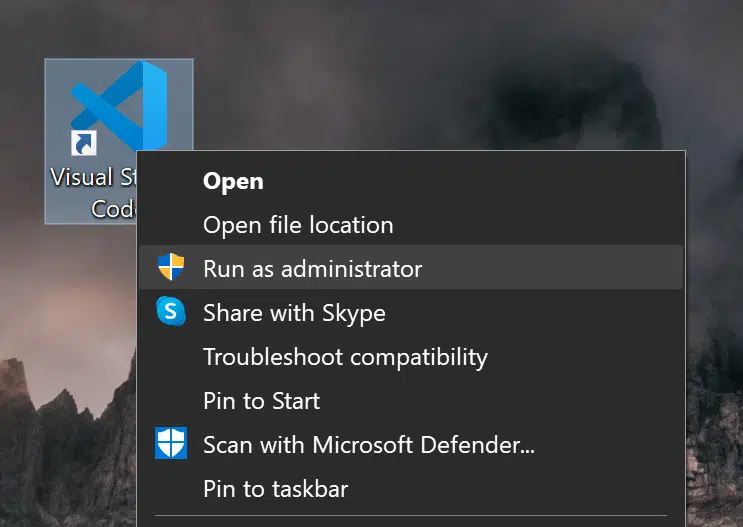
- Right-click on your Visual Studio Code application icon and click “Run as Administrator”

- Now click on Help
- Hover over to Check for Updates
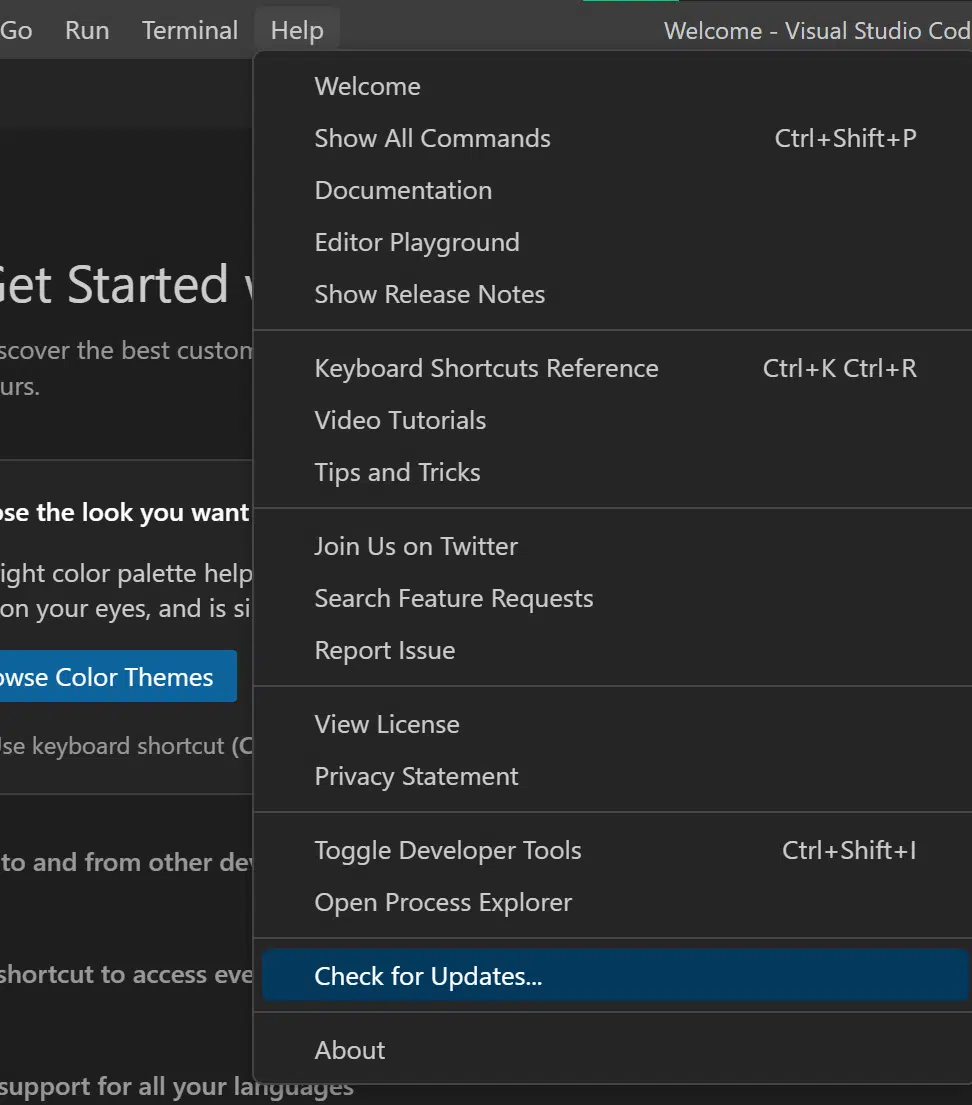
Then your application will search for updates, downloading and installing them successfully.
2. Repairing Your Visual Studio Code
If restarting your visual studio code does not fix your problem, you can try repairing your application. Often, due to some prior updates clashing with each other, there can be trouble while installing new updates. Apart from this, there are many reasons your existing application files need repairing.
It is, however, important to note that your user settings will be reset, and your existing assemblies will be reinstalled when you repair your application.
You can follow the steps below to repair your Visual Studio Code application:
- In the Windows search, type “Visual Studio Installer” or you can alternatively find it at
C:\Program Files (x86)\Microsoft Visual Studio\Installer\vs_installer.exe
- Once the installer opens, look for your version of Visual Studio
- Click on More and then click on Repair.
After repairing your application, simply launch your Visual Studio Code and try updating it again; hopefully, it will work flawlessly!

3. Disable Your Antivirus
One of the ways that you can get your application to update is by disabling your antivirus. Often, antivirus softwares tend to stop applications from updating or functioning correctly as the antivirus deems it unsafe to do so. By disabling your antivirus, you might be able to update your Visual Studio Code successfully, but there’s no guarantee that your antivirus might interfere again (after you have enabled it).
It might also delete random files from the installation files. If this is the case, the best course of action can be to change your antivirus and install the antivirus compatible with Visual Studio Code.
4. Ensure Your Visual Studio Code Runs in Administrator Mode
Your Visual Studio Code application would want to update your application in the background. One way to ensure that it is allowed to do this is to ensure it runs in administrator mode. The program not running in administrator mode is one of the reasons why problems with updating the application happen.
Follow the steps below to ensure your Visual Studio Code runs in administrator mode.
- Right-click on Visual Studio Code.exe and click on Properties
- In Properties, click the Compatibility tab
- In the Settings section, click on “Run this program as an administrator”
- Save these settings
Now, your application will have complete administrator access and will now be able to update in the background without causing any problems.
5. Delete the Installer Folder
Deleting the installer folder is one of the most common ways users can fix their problems with Visual Studio Code updates. By doing this, the installation metadata is cleared, and the Visual Studio Installer files are reinstalled.
You can follow the following steps to delete the installer folder:
- Close your application and Visual Studio Installer if running
- Delete the installer folder by finding it at the following address:
C:\Program Files (x86)\Microsoft Visual Studio\Installer
- After deletion, run the bootstrapper for Visual Studio. You can find the bootstrapper in your Downloads folder: “vs_[Visual Studio edition]__*.exe” or a file that matches this pattern. You can also directly download the bootstrapper from the Visual Studio website.
- Now, run and update the Visual Studio Code application
6. Remove All Installation Files
Removing all the installation files is a solution that has to try at the very end because it resets your entire application and makes you reinstall Visual Studio Code. This is a good idea because it eliminates any errors and bugs on your part and will allow you to move to the absolute last stage of the troubleshooting process, i.e., reporting the bug to the developers themselves.
To delete all installation files, first, you will have to uninstall application
- Type “Add or Remove Programs” in the Windows search bar
- From the list, select Visual Studio 2022 and Microsoft Visual Studio Installer
- Click on Uninstall
After this, simply download the bootstrapper for Visual Studio Code and run your application.
Conclusion
With the steps highlighted above, you will find that you can fix your Visual Studio Code update issues. The strategies above cover most of the fixes that users worldwide have found to help them the most. If none of these fixes work for you, then you can report the problem to the developers and talk to the Live Chat feature of Microsoft.